Slow Cooked Corned Silverside

I think before I came to live on the farm the only time I would have had silverside would have been as a cold cut from the deli. Eating silverside as a roast was just not something I was familiar with doing. The first few times I ate silverside it was made by Neil’s dad, cooked in a pot for a couple of hours with some aromatics. It was delicious and different. Once I understood how to cook a silverside I took over cooking it for the family. Still delicious and different. Then I read about how people where cooking it in their slow cooker and I decided I had to try that too! There was not a single person in the family that thought this was going to turn out ok. But guess what! It did! *relief*

Silverside is a very lean cut and often in Australia you only get it in the form of corned beef, meaning it’s been brined. I like to think of it as beef ham. When people get it home it’s often cooked in a pot of water with some onion, celery, carrot, brown sugar, bay leaves, peppercorns, cloves and some malt vinegar. That’s exactly what I did to ours, only I did mine in the slow cooker.

Death start onion!

Death start onion!

I like to call my onion studded with cloves my Death Star onion. I don’t know why it reminds me of the Death Star, it just does. We don’t normally eat the vegetables the meat cooks in but I’m sure you could if you wanted. Once I had my vegies sorted I added my meat to the slow cooker as well as the malt vinegar and the rest of the aromatics and filled the slow cooker with water until the silverside was mostly covered.

I think this is the point where Neil’s dad came in to see what I was doing. He was not impressed. To be fair this doesn’t look great.

I think this is the point where Neil’s dad came in to see what I was doing. He was not impressed. To be fair this doesn’t look great.

Turned it over. Still doesn't look great.

Turned it over a few hours before it was ready. Still doesn’t look great.

I left the silverside to cook for 7-8 hours without touching it. It wasn’t until later in the day when I noticed that some of the roast was still out of the water so I flipped over the silverside just to be on the safe side. At the 9 hour mark I pulled the silverside out and rested it under some alfoil and a tea towel for about 20 minutes. I was starving, after about 5 minutes I was demanding Neil carve it so I could have dinner. He was adamant it rest for at least 20 minutes. I did give me a chance to make up my seeded mustard cheese sauce and beans though 😛

It wasn’t until about half way through dinner that everyone confessed that they had no faith in the slow cooker silverside. Everyone. Everyone thought it was going to a fail, a massive fail. Be it too dry, too tough, or just too much fail. No one thought it was going to be good. Thankfully, everyone thought it was the best silverside I’d ever cooked. The meat was so soft and falling apart a little as Neil carved it up and it wasn’t at all dry. This will definitely be how I cook all our silversides from now on.

Our was a 2kg silverside, it fed 4 adults for dinner, 4 adults the next day for lunch in sandwiches, I used some pulled apart and mixed through mash to make mash patties, Neil took some to work for lunch, and I snacked on it a little too when no one was looking. Basically, a 2 kg silverside is a lot of meat and will probably feed you forever.

So much yum! Mash and beans go really well with mustard cheese sauce.

So much yum! Mash and buttery beans go really well with mustard cheese sauce.

Slow cooked corned silverside

Feeds at least 8 people.

Ingredients:

2kg corned silverside

1 carrot

1 stick of celery

1 cup of brown sugar

1 cup of malt vinegar

1 onion studded with cloves

A couple of bay leaves

A tablespoon of peppercorns

Water

Method:

  • Place everything into the slow cooker with the silverside on top
  • Fill the slow cooker with water until the water level is above the silverside
  • Turn the slow cooker on low for 8-10 hours
  • Check halfway through and turn the silverside over if necessary
  • Remove the silverside from the slow cooker, allow it to rest covered in alfoil for at least 20 minutes
  • Carve and serve with your favourite sides and some cheese sauce (we like mustard cheese sauce)

***If you want to do this in a pot instead, put everything into the pot and cover with water, let it come to a boil, turn down the heat to a gentle simmer, and simmer for 1.5-2 hours.


Lamb Yiros

I think about food a lot. All the time. I’m constantly asking Neil what he wants to eat, sometimes because I’m really hoping what he wants to eat is what I want to eat but I haven’t said out loud what it is and then get disappointed that we didn’t want the same food 😛 But sometimes I think about food a little too much. So much so that our dinner plan changes every hour, back and forth until it’s too late and we have to go out for pizza. It almost happened on Saturday but I was saved! We ended up not selling two of our lamb legs at the market and with my sister and her partner coming over for dinner it was the perfect amount of meat and the perfect cut of meat to make yiros! Or Gyros or souvlaki or kebab or whatever else they’re called in your part of the world.

The basic idea behind a good yiros is really simple. Tasty meat on some sort of flat bread with some garlic sauce and salad. How you make is going to depend on how you like it. As a teenager I’d have my yiros with mayo, bbq sauce, and cheese. I’m not even ashamed, it was delicious! As an adult I make my own tzatziki for my sauce and quinoa tabouli as my salad, I still have cheese though 😀 If I’m being good I’ll even make the flatbread. It sounds like a lot of work because you’re making a few different things but when you take it step by step and if you have time make it over a couple of days it’s really very simple.

We’ll start with the meat. I had two 1.6kg lamb legs, they were the top part of the leg, so a little less meaty than lower down but still just as tasty. If I’m strapped for time like I was, then I’ll coat the meat in olive oil and Nostimini. Nostimini is our go to BBQ seasoning, I want to say it’s heavy on the cumin and oregano. If I have time to marinate overnight, I’ll do it in olive oil and a combination of fresh herbs and spices, still heavy on cumin and oregano.  My lamb had a nice layer of fat on it and probably didn’t need the oil but I went with it anyway out of habit more than anything and I only had 45 minutes of marinating time.

2x1.6kg lamb legs

2×1.6kg lamb legs

Seasoned!

Seasoned!

When we first started at the farm we did our own meat chickens and we bought a rotisserie attachment for our BBQ, it was one of the greatest farm purchases to date. We rotisseried everything! We rotisseried so often ours stopped working and we took out the one we bought for my sister as a Christmas present and used hers. I think we still owe her one… A gas BBQ is pretty straightforward, you only use the burners on either side of the spinning meat. We’ve upgraded to a heavy duty charcoal BBQ for our rotissering now. If you know what you’re doing and you don’t mind risking some arm hairs it’s awesome. Welding gloves come in handy too. Nothing beats the charcoal smoky-ness.

Cooking! Coals at either end and a drip tray in the middle.

Cooking! Coals at either end and a drip tray in the middle.

You might have to google the finer details of using charcoal but from my understanding you heat up the charcoal on either side of where your meat will be and wait for it to become white and the flames have died down. Position the meat on the rod and away you go! Having a drip tray under the meat is a good idea, also watch the meat in the beginning. We’ve sometimes had dinner catch fire because there was no drip try and the fire was directly under the meat. If we aren’t cooking for a long time we start with the temperature at 200C and it’ll drop a little bit during the cooking time. If you’re cooking for any longer than a few hours you’ll need to top up the charcoal. Our lamb cooked for about an hour and a half and rested for an hour. It’ll probably work just as well in the oven and if you wanted to you could cut your meat into strips and fry it in a pan or a BBQ plate.

Done! After an hour and a half. The black bits are the best!

Done! After an hour and a half. The black bits are the best!

While the meat was cooking and resting I managed to get the other bits done.

Tzatziki is best started a day ahead. If you have the time and the patience, put your greek yoghurt into some cheese cloth (I use a new bit of chux) and let it drain. It makes the tzatziki thicker and richer. I didn’t have the time to wait so I didn’t drain mine, if you have a thick yoghurt to start with it’s not going to matter but if you have a thin yoghurt your tzatziki will be runny. Still tasty but runny. I used 3 continental cucumbers to a litre of yoghurt, though the number of cucumbers is up to personal taste. You will need to squeeze the water out of the cucumber, mix in a tablespoon of salt and let it sit for a few minutes before squeezing out the water, the salt makes it easier. Everything else in the tzatziki is purely up to your own taste.

We love tzatziki at home. We'll eat it with almost anything.

We love tzatziki at home. We’ll eat it with almost anything.

I have never been a fan of tabouli and I think it’s because the ones I’ve eaten have too much parsley, so while I’m calling this tabouli others might think of it as quinoa salad. Also, I don’t think I’ve ever seen burghul in the supermarket and that’s why I use the quinoa. I prefer the flat leaf parsley for no other reason that I like how it looks over the curly leaf parsley. Also a cup of quinoa makes a lot of cooked quinoa, I learnt that lesson the hard way the first time, and we were eating it for days! Making this a day before serving is fine.

So many pretty colours! And so easy to make!

So many pretty colours! And so easy to make!

I would never buy store bought tzatziki to me that seems crazy but having said that I do buy flatbread all the time when I’m being lazy. But flatbread is a much much simpler process than tzatziki! I use this flatbread in place of naan if we eat curry and just don’t roll it out as thin. I’ve grilled it the next day to make it crispy so I can shovel leftover tzatziki in to me. It’s versatile and easy. I should make it more often! But I have to confess. I cheat when I make this, I don’t spend 10 minutes standing over it kneading like you’re supposed to. I throw all the ingredients into my food processor and my machine does it for me. The herbs are optional, I like the little green flecks and I had leftover parsley. Sometimes I throw in a tablespoon of Nostimini, other times I leave it plain. It’s completely up to you. We had a bit of a panic moment when we made these, they seemed a little thin and a little brittle but we adjusted the thickness when we rolled it out and we covered the stack with a damp tea towel as we were cooking and we didn’t have any burst yiros! If you reheat it in the mircrowave the next day and you want it to be soft, sprinkle some water on it before covering and reheating.

From the flatbread quantities I managed to make 14. I had my sister helping me while the meat was resting. I didn’t mean to make 14 but I was pulling out chunks from the food processor. If you want to be really precise about it grab the whole lot and divide it up evenly. Ours were rolled out to about 3-5mm thickness and then fried in a dry pan (no oil) on medium heat. They should puff up at the right heat, you might need to mess around with the first couple before you find the right heat.

Using my food processor to knead my dough for me.

Using my food processor to knead my dough for me.

Looking good but still trying to find the perfect temperature.

Looking good but still trying to find the perfect temperature.

I managed to get the tzatziki, flatbread, and tabouli done while the meat was cooking and then resting. That worked for me because aside from prepping the meat I had nothing else to do with it, I didn’t even take it off the rod and slice it. If you’re doing it without help you’ll want to do this with lots of time to spare.

My 3.2kgs worth of meat was enough for 8 serves but you have to remember the cuts of lamb I used had a little more bone in it than the lower end of the leg.  So depending on the cut you use you may have more meat. We had the leftovers the next day as breakfast yiros. I warmed the meat in a fry pan and fried it until it was crispy all over. It was the greatest breakfast ever. 😀

Yup there's a bit of fat but that's what makes it so tasty!

Yup there’s a bit of fat but that’s what makes it so tasty!


Lamb

2×1.6 legs of lamb

Oil to coat lamb

Seasoning (Nostimini OR your own mix)

  • Coat lamb in marinade and oil and refrigerate until ready. Preferably overnight but as little as 45 mins will do.
  • For a Rostisserie: Get charcoal/bbq/oven ready and preheat to 200C
  • Position meat and mount on rotisserie unit
  • Cook for 1.5 hours or until meat thermometer reads your desired temperature. (med/well done)
  • For a BBQ plate: Slice meat to preferred thickness and cook on high heat on the plate until done
  • Allow meat to rest, covered under alfoil
  • Don’t forget to mix the meat through all the resting juices, it’s the best part!

Tzatziki

1kg greek yoghurt

3 continental cucumbers (peeled, deseeded, and grated)

Small handful of mint leaves (optional)

1 tablespoon salt

1-2 tablespoon lemon juice

1-2 teaspoons of crushed garlic

  • Strain the yoghurt of excess whey through cheese cloth (optional)
  • Mix salt through cucumber and sit for 10 mintues
  • Squeeze out excess water from cucumber
  • Mix yoghurt, cucumber, and remaining ingredients together
  • Store in fridge until needed

Tabouli

1 cup quinoa

Half bunch parsley (finely sliced)

3 medium tomatoes (diced)

Half a purple onion (diced)

Tablespoon of lemon juice

Tablespoon of olive oil

Salt and pepper to taste

  • Cook the quinoa according to packet instructions and allow to cool
  • While the quinoa is cooling season with salt, pepper, lemon juice, and olive oil
  • Mix in the rest of the ingredients and store in fridge until needed
I love looking at the tabouli! It makes me happy!

I love looking at the tabouli! It makes me happy!

Flatbread

Makes12-14

500gm flour (I used bakers flour but plain flour is fine)

300gm water

20gm oil

2 teaspoons yeast

1 tablespoon finely chopped fresh herbs (optional, can be replaced with dried herbs)

Pinch of salt

  • Mix all the ingredients together
  • Knead on a floured surface for 10 minutes
  • Let it rest in an oiled bowl for 15 minutes, covered with a tea towel or cling film
  • Divide the dough into balls and cover them with a tea towel. Roughly 12-14 balls.
  • Roll out each ball with a thickness of about 3mm, try not to stack them but keep them well floured if you do stack them
  • Fry the flatbread in a dry pan until bubbles form on one side and then flip
  • Stack the cooked flatbread and cover with a damp tea towel


Slow Cooked Pork Shoulder

OK, I have an obsession I know! But this is my second to last slow cooked roast blog. Maybe. I love them a lot! This one also involves the slow cooker!

So! Pork shoulder. It’s a hard working bit of meat. Free ranged pigs in particular have big shoulders. They are forever rooting around finding tasty things to eat and digging holes, this builds the muscles and it is muscle that you eat. It’s dense and it has fat running through it, which makes for good slow cooking meat.

I’m not going to lie, I was beyond sceptical about this method of cooking pork that would also give me crackling. How can pork sit in a slow cooker without any fluid for 8 hours still give me crackling?! That’s crazy. But my friend Adam told me it could be done. And if Adam can do it then so can I! Also, I love crackling and I love one pot cooking.

My rolled roast sitting on my trusty trio of veg!

My rolled roast sitting on my trusty trio of veg!


I’m using a pork shoulder prepared by our butcher. It’s been boned and rolled and as a handy bonus the skin is scored. To prepare the crackling I used the same method as the Asian hock. I poured boiling water only on the skin, rubbed it down with salt, and left it in the fridge overnight covered with some paper towel. My mum has tried to explain to me another method that involves lemon and salt and doesn’t take all night. I’m not really clear on the details but I’ll definitely get her to show me how it works and I’ll give that a try next time.

The next morning I pulled out my pork shoulder, sprayed it with some oil, and placed it in the slow cooker on a bed of my 3 favourite vegetables. Carrot, onion, and celery. I turned the slow cooker on low and left it for roughly 10 hours.


Yup, that looks unappetising.

Yup, that looks unappetising.

The very first time I used the slow cooker for pork Neil was ready to call out for pizza because he was not convinced it would work. To be fair, it does not look good at the 10 hour mark. Skin looks a bit gelatinous and the meat looks grey. But you have to trust it and push on. A half hour before you pull your roast out of the slow cooker crank the oven as high as it’ll go and when its’s reached the right temperature grab your roast and place it into an oven safe container and put it in the oven. Once I put my roast in I try to remember to turn the oven back down to 220C and I leave the roast in there for about a half hour. And then you cross all your fingers and toes and hope you get crackling!

With this roast, I did get crackling but I was worried about how much crackling I was getting and how long the roast had been in the hot oven. I think my problem was the orientation of the skin. Instead of being on top of the meat it was around the meat, it might not be a problem but in my head that was the problem I was having. It might also be that my oven is literally falling apart. (I’m using cardboard to wedge the door closed. I had contemplated using Neil’s 5 foot fencing stick or crowbar as he likes to call it to prop the oven door closed until Neil’s dad came up with a much much better idea J )

But back to the crackling! At the half hour mark, I had crackling but not all of it had crackled and I was worried about my meat drying out, it had at that point been cooking for ten and a half hours after all. I pulled the roast out of the oven and my plan was to separate the meat from crackling and put the crackling back into the oven so that the meat could rest. In theory this was a great plan, in practice not so.

I have no pictures of this part of the process so you’re going to have to really use your imagination.

I have previously pulled crackling from pork and put it back in the oven with great success. Not so this time. In the past it had been from whole cuts of meat, not meat that was being kept together with netting. My problem with this roast is that my half crackling had stuck to my netting. Instead of being able to pull the crackling off as a whole sheet it was coming off in bits and pieces and flat out sticking to the netting. The whole process got a lot messy and to add to my mess, my pork was so tender that it was falling apart in giant chunks. In the end, I did get my crackling off and on to a tray to go back into the oven and it crisped up beautifully. Next time though, once I get the meat out of the slow cooker I’ll remove the netting before it goes into the oven just in case I have to take the meat out and let the crackling crisp up a little more.


Crackling and pork!

Crackling and pork!

Even though this was messier than I had wanted, it turned out really well. The meat was tender enough that instead of carving the meat, Neil pulled it apart with two forks. I did get crackling and it was beautiful. I also did a tray of roast veggies to go with dinner. It fed 5 adults with more than enough left over for a couple more people and we had it as a celebratory dinner for my sister’s engagement! Yay for Sally and Tim!


Slow Cooked Pork Shoulder Roast

Feeds at least 6 adults with big appetites.

Ingredients:

2kg boned out and rolled pork shoulder

2 carrots in large chunks

2 sticks of celery in large chunks

1 onion quartered

Method:

  • Pour boiling hot water over the skin only of the roast, rub in salt, cover, and refrigerate overnight.
  • Next morning, place your vegetables in the bottom of your slow cooker bowl with your pork sitting on top. Turn your slow cooker on low and leave for 8-10 hours.
  • Half an hour before you’re ready to take your pork out of the slow cooker turn your oven to its highest heat setting.
  • When the oven is ready, remove your pork from the slow cooker and place it into an oven safe dish, spray the skin with some oil, and place the dish into the hot oven. Turn the temperature down to 220C.
  • Check your roast after 30 mins. If the crackling is done remove the roast from the oven, cover it in alfoil and let it rest for 30 mins. If the crackling is not done, take the roast out of the oven and separate the meat from the crackling, place the crackling back on a tray and put it back into the oven until the crackling has crisped up. Cover the meat and rest for 30 minutes.
  • Use the pan juices from the slow cooker to make gravy. Serve pork with roast veggies and gravy!
Slow Cooked Lamb Belly

Slow Cooked Lamb Belly

We’ve had these amazing looking rolled and stuffed lamb bellies available at the market for a while now and they always look amazing! And because they look amazing I haven’t had a chance to cook one until today!

We love lamb belly or lamb flap. I normally call it flap, Neil just calls it amazing. It’s a super fatty cut of meat, quite thin, and if you cook it wrong it will be tough. One of the reasons I’m doing this blog is because I gave the wrong advice to a customer and I’m mortified by it. She ended up with an inedible bit of meat instead of what should have been a melt in your mouth delicious cut of lamb. And I am so terribly sorry!

It’s like a meat swiss roll.

It’s like a meat swiss roll.

You can see that there’s a fair amount of fat in this cut but as you cook it, the fat renders down and flavours the meat. Fat is flavour after all.

Did I mention that this was a one pot meal?! Because it is! 😀 I feel like it’s the lazy way to cook but it’s so good! Unfortunately, I’m also cooking this on a 35C day so my kitchen is a bit hot, that’s less good but I’m also outside hanging out with family while this is cooking so that’s good!

My favourite one pot meal veggies sitting in the bottom, lightly browned.

My favourite one pot meal veggies sitting in the bottom, lightly browned.

I’m sure that you can throw almost any hard root type vegetable that you like to eat into the bottom of the pot and you’d be good. Probably not sweet potato, that’s a bit soft. Maybe towards the end though! But once you have your vegetables sorted out, pop the lid on and put the whole thing into the oven.

It shrunk a lot!

It shrunk a lot!

This is about the 3 hour mark. We took the lid off and put it back into the oven and turned the heat up a bit. About twenty minutes later I came back to it and turned it down. What I would do next time is wait until the 3.5 hour mark and then take the lid off and turn the heat up. This is also dependent on the size of my roast. The roast I used today was 1.1kg, had it been 1.5kg I would have added an extra 30-45 mins to the initial 3.5 hours. I’ve also used this method of cooking for the stuffed and rolled lamb shoulders that we bring to market as well. It works the same, just remember to adjust cooking times for bigger or smaller roast.

All done!

All done!

The stuffing is way darker in this picture. But the outside fat is super crispy. I like crispy fat. Taking off the lid is a good move. My only problem at this point is trying to remove the netting and not tear apart the roast. But it’s not really my problem because once the meat is out of the pot and resting under some alfoil it becomes Neil’s problem 😀 I think the adjustment of the cooking time will help with removing the netting or even before cranking the oven to 200C snipping the netting off might work too though.

Turns out swiss roll meat is a bit hard to carve when it’s falling apart on you.

Turns out swiss roll meat is a bit hard to carve when it’s falling apart on you.

Ok, so this isn’t the most awesome picture I could have taken. This basically looks like a mess. But it’s a freaking delicious mess! Yes, it was hard to carve. Yes, this is not the roast you serve your new girlfriends parents the first time you meet them. Yes, we may have to get a better carving knife or meat carving person. But oh my goodness! So tasty. The fat kind of sticks to the inside of your mouth but it is so tasty!

Like I said earlier this roast was 1.1kg and when it came out of the oven to rest it was 690g. It lost a lot of weight, there was a lot of liquid fat in the bottom of the pot which I added to my jar of cooking fat in the fridge. And as a side note once that fat cooled it was super hard. Rock hard. Way different to the pork fat that was in my jar. But! Back to the size of the roast! It started as 1.1kg and it fed 3 adults with enough leftover meat for a fourth adult. The only additional thing we had with dinner was thick slices of fresh bread covered in butter. I would have been in trouble if we had 1 or 2 extra people for dinner that night. But a 1 kg roast should be enough for 4 people provided you have additional sides.

My sister said I should have an actual recipe written out at the end of the blog. But I didn’t want to. And then she insisted. She’s really bossy so here it is:

Lamb Belly Roast

Feeds 4 Adults

Ingredients:

1kg Lamb belly roast

3 carrots

3 sticks of celery

3 large potatoes

1 large onion

  • Set oven for 180C
  • Lightly brown vegetables in heavy bottom oven safe pot
  • Place lamb belly into pot on top of the vegetables and put the lid on
  • Place pot into the oven and leave it for 3.5 hours
  • After 3.5 hours take the lid off the pot, return the pot to the oven and turn the oven to 200C
  • After half an hour take the pot out of the oven and transfer the lamb belly roast to another dish. Cover with alfoil and let it rest for half an hour.
  • The vegetables can be transferred to another dish and placed in the oven (turned down or off) to keep warm and you can make a gravy from the remaining pan juices.
  • Serve with your choice of sides and vegetables from the pot. Mash is always a winner.
Yup. Tasty.

Yup. Tasty.

To AI Or Not To AI, That Is The Question.

Artificial Insemination (AI) can be a touchy subject for ethical meat producers for some reason.  I’ve hunted around to find a free-range standard we could sign up to, and the best one I found categorically said that you can’t AI.  While I understand that natural matings are clearly a better way to go, as is any natural behaviours, I’m not exactly sure why AI is so taboo.  There are clear advantages to being able to control your genetics and to not having to mess with a boar (pigs are painful to keep, but boars are next level painful).

It may be because a lot of farms that AI also use hormone treatments to control their girl’s cycles.  That use of hormones is uncool, and also against that standard I found.  It’s not something we’d ever consider, but is really very common.  Our method involves a bit more intensive husbandry, observance, and record keeping, but it’s also less reliable and more prone to gaps in matings.  This is another reason why free-ranged produce is more expensive, and why it absolutely should be more expensive.  To do it properly increases the labour involved exponentially, while giving potentially patchier results.  Of course, the flipside of that is that it’s better for the animals and the end product is higher quality.  That’s why people should be prepared to pay that bit extra for ethically grown meat.  But I digress…

While we don’t plan to AI for our production, I have been considering it as a way to breed our replacement gilts.  My end-game is to have another property with the bulk of our breeders and growers, while keeping a couple of girls on our home property from which we can breed our replacement girls.  Most of the breeding would be done naturally, but I want to breed the replacements using AI.  The reasons for this are:

  • Keeping a boar just to service two girls once or twice a year is a waste.
  • Carting the girls back and forth between properties to get them pregnant is unnecessarily painful.
  • Keeping bloodlines separate is difficult. You never want a gilt/sow to be related to the boar servicing her.

Using AI removes all of those problems.  We can buy in semen from completely unrelated bloodlines, and can even experiment with the breeds a bit.  For example, I’d like to try both my white and my black girls with a Duroc.  Buying a Duroc boar in just for that experiment would be expensive and potentially wasteful should we choose to go a different way.  Buying in Duroc semen is inexpensive and risk-free.

Basically, I can have my second, larger property with a number of sows and a couple of boars.  They’ll do their thing naturally, and everybody will be happy.  At the same time, we can expect to have to replace at least a couple of girls a year.  I can have my two breeders at home with no boar and they can give me a lazy litter a year each via AI.  I can choose the best of the girls from those litters for my replacement breeders, injecting strong, uncrossed bloodlines into my herd, and the excess can be rolled in with the growers.  It’s a good, smart plan.

Anyway, all arguments about the ethicality of AI aside, right now we have a gap in our production.  This actually highlights one of the problems I alluded to about the potential patchiness of results when doing things naturally.  Our boar, Boris, has given us nearly 100 babies.  While he’s painful to manage, being a few hundred kilograms of rock-hard, tusked stubbornness, he’s done well as a sire.  The problem we face now isn’t his willingness to perform, nor is it our sow’s cycles or ability to take Boris.  The problem we have is purely mechanical – Boris is now about an inch too short to make the penis-to-vagina connection.  We watch him try like a champ, but he’s not quite getting there.  His success in the past was because the girls were a little shorter, or a couple of times we’ve seen them standing in a hole (e.g. their wallow) while he was on the higher ground (literally, definitely not morally).  Now I’m no vet, but I’m pretty sure a lack of penetration leads to a lack of pregnancy.

Ultimately we’ll need a new boar.  In fact, we’ll probably need a couple once we’re at our target production.  I don’t want to get them now though, not until we have the second property.

At the same time, we’re keen to experiment with different breeds to get an idea which will give us the best offspring.  To date, our best results were the Blue Merles – the half white, half heritage babies.  The offspring were strong, grew well, and the meat was hands-down the best we’ve produced.  At the same time, the full-blood Large Blacks we’ve grown on tend to run to fat.  I’m thinking that we might be better putting the muscular Durocs over those blacks to see if we can produce something special.  The best, and probably really only sensible, way to do that is via AI.  We can both experiment with the breeds we use and fill our gap in production at the same time.

Peyton and I went to a local pig farm a few weeks ago with one of the vets in charge of our Herd Health Management program, where the farm staff taught us how to AI.  They were amazingly helpful, and the process is surprisingly easy.  In addition to that, the guy who owns that pig farm has offered to sell us semen (from a boar, just to be clear) and the catheters necessary to get said semen into our girls.  That’s a huge help to us.  The genetics in that pig farm are controlled more tightly than you’d realise, and he has a number of his own pure-bred boys on a property in Clare whose only job is to produce the semen he uses on his farm.

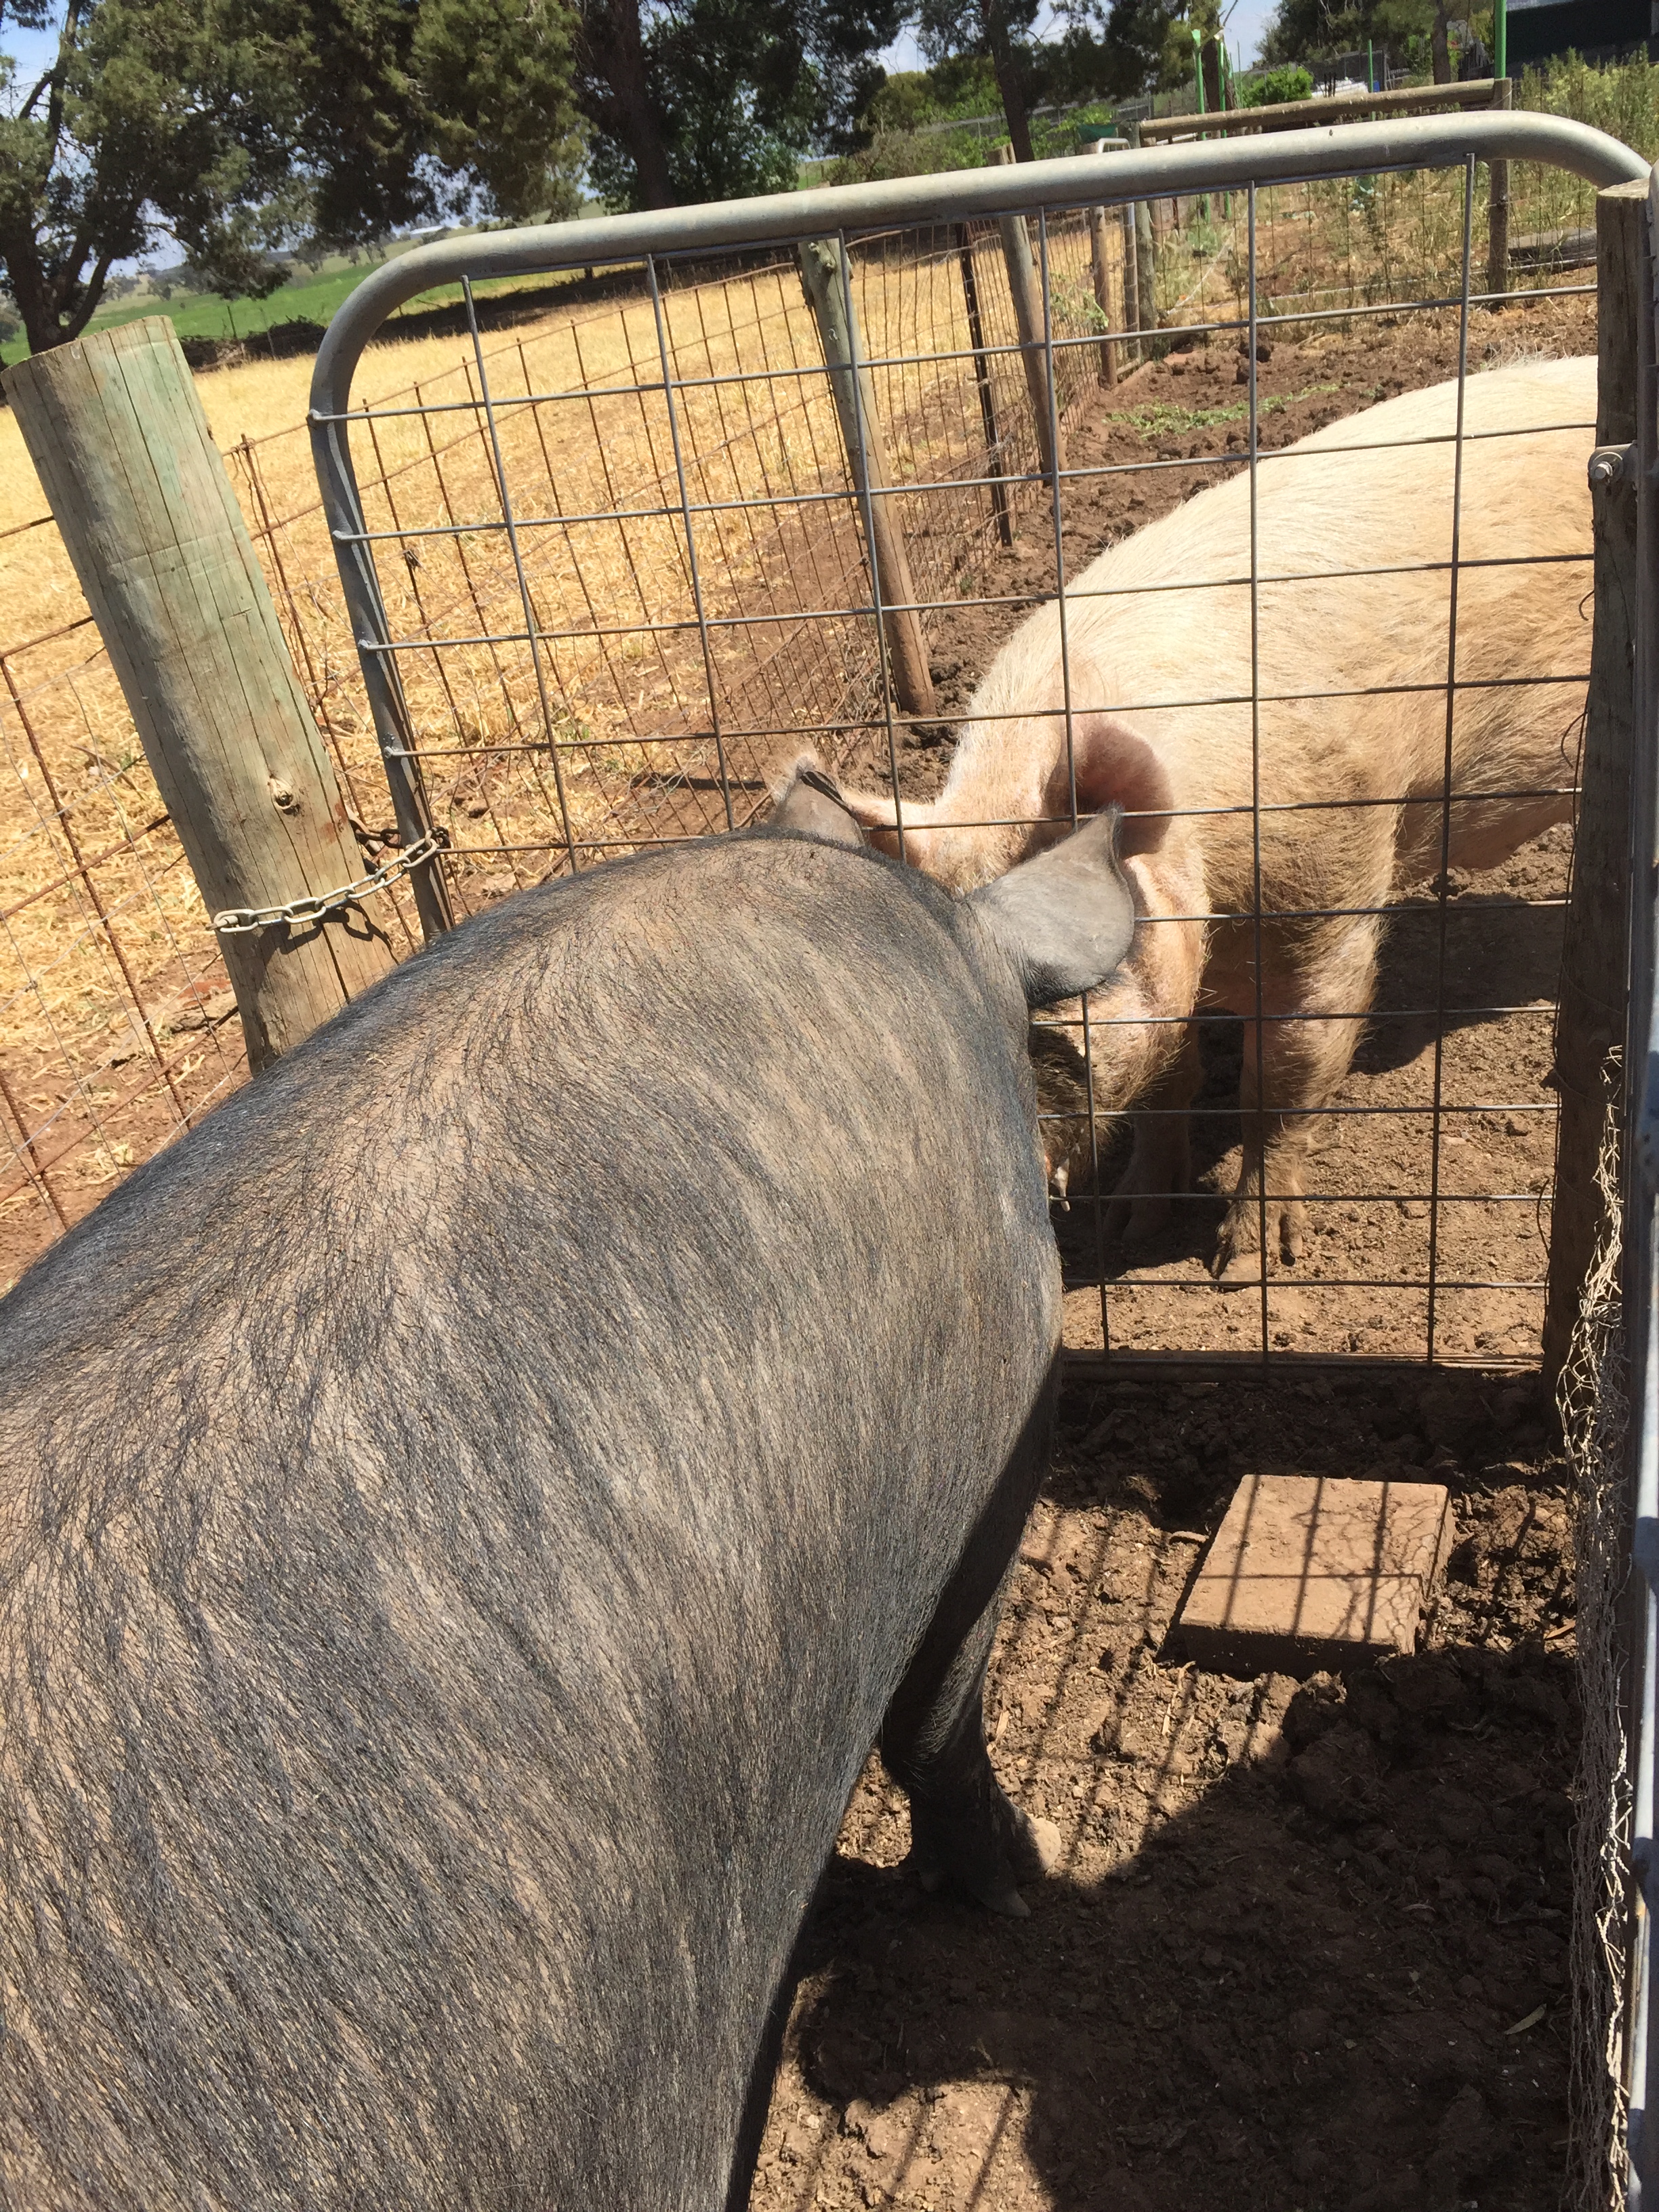
We track our sow’s oestrus cycles.  We know when they’re in season due to their behaviour, which can vary slightly from girl to girl.  Knowing them as well as we do though, we can pick it fairly accurately.  To ensure they’re in season all you need to do is push down on their back and rub their flanks.  They’ll enjoy a back scratch if they’re not in season, but pushing down on their back will piss them off (it’s analogous to a boar trying to mount them).  However, push down on their back while they’re in season and they’ll actually arch into it.  It’s pretty obvious once you’ve seen it.

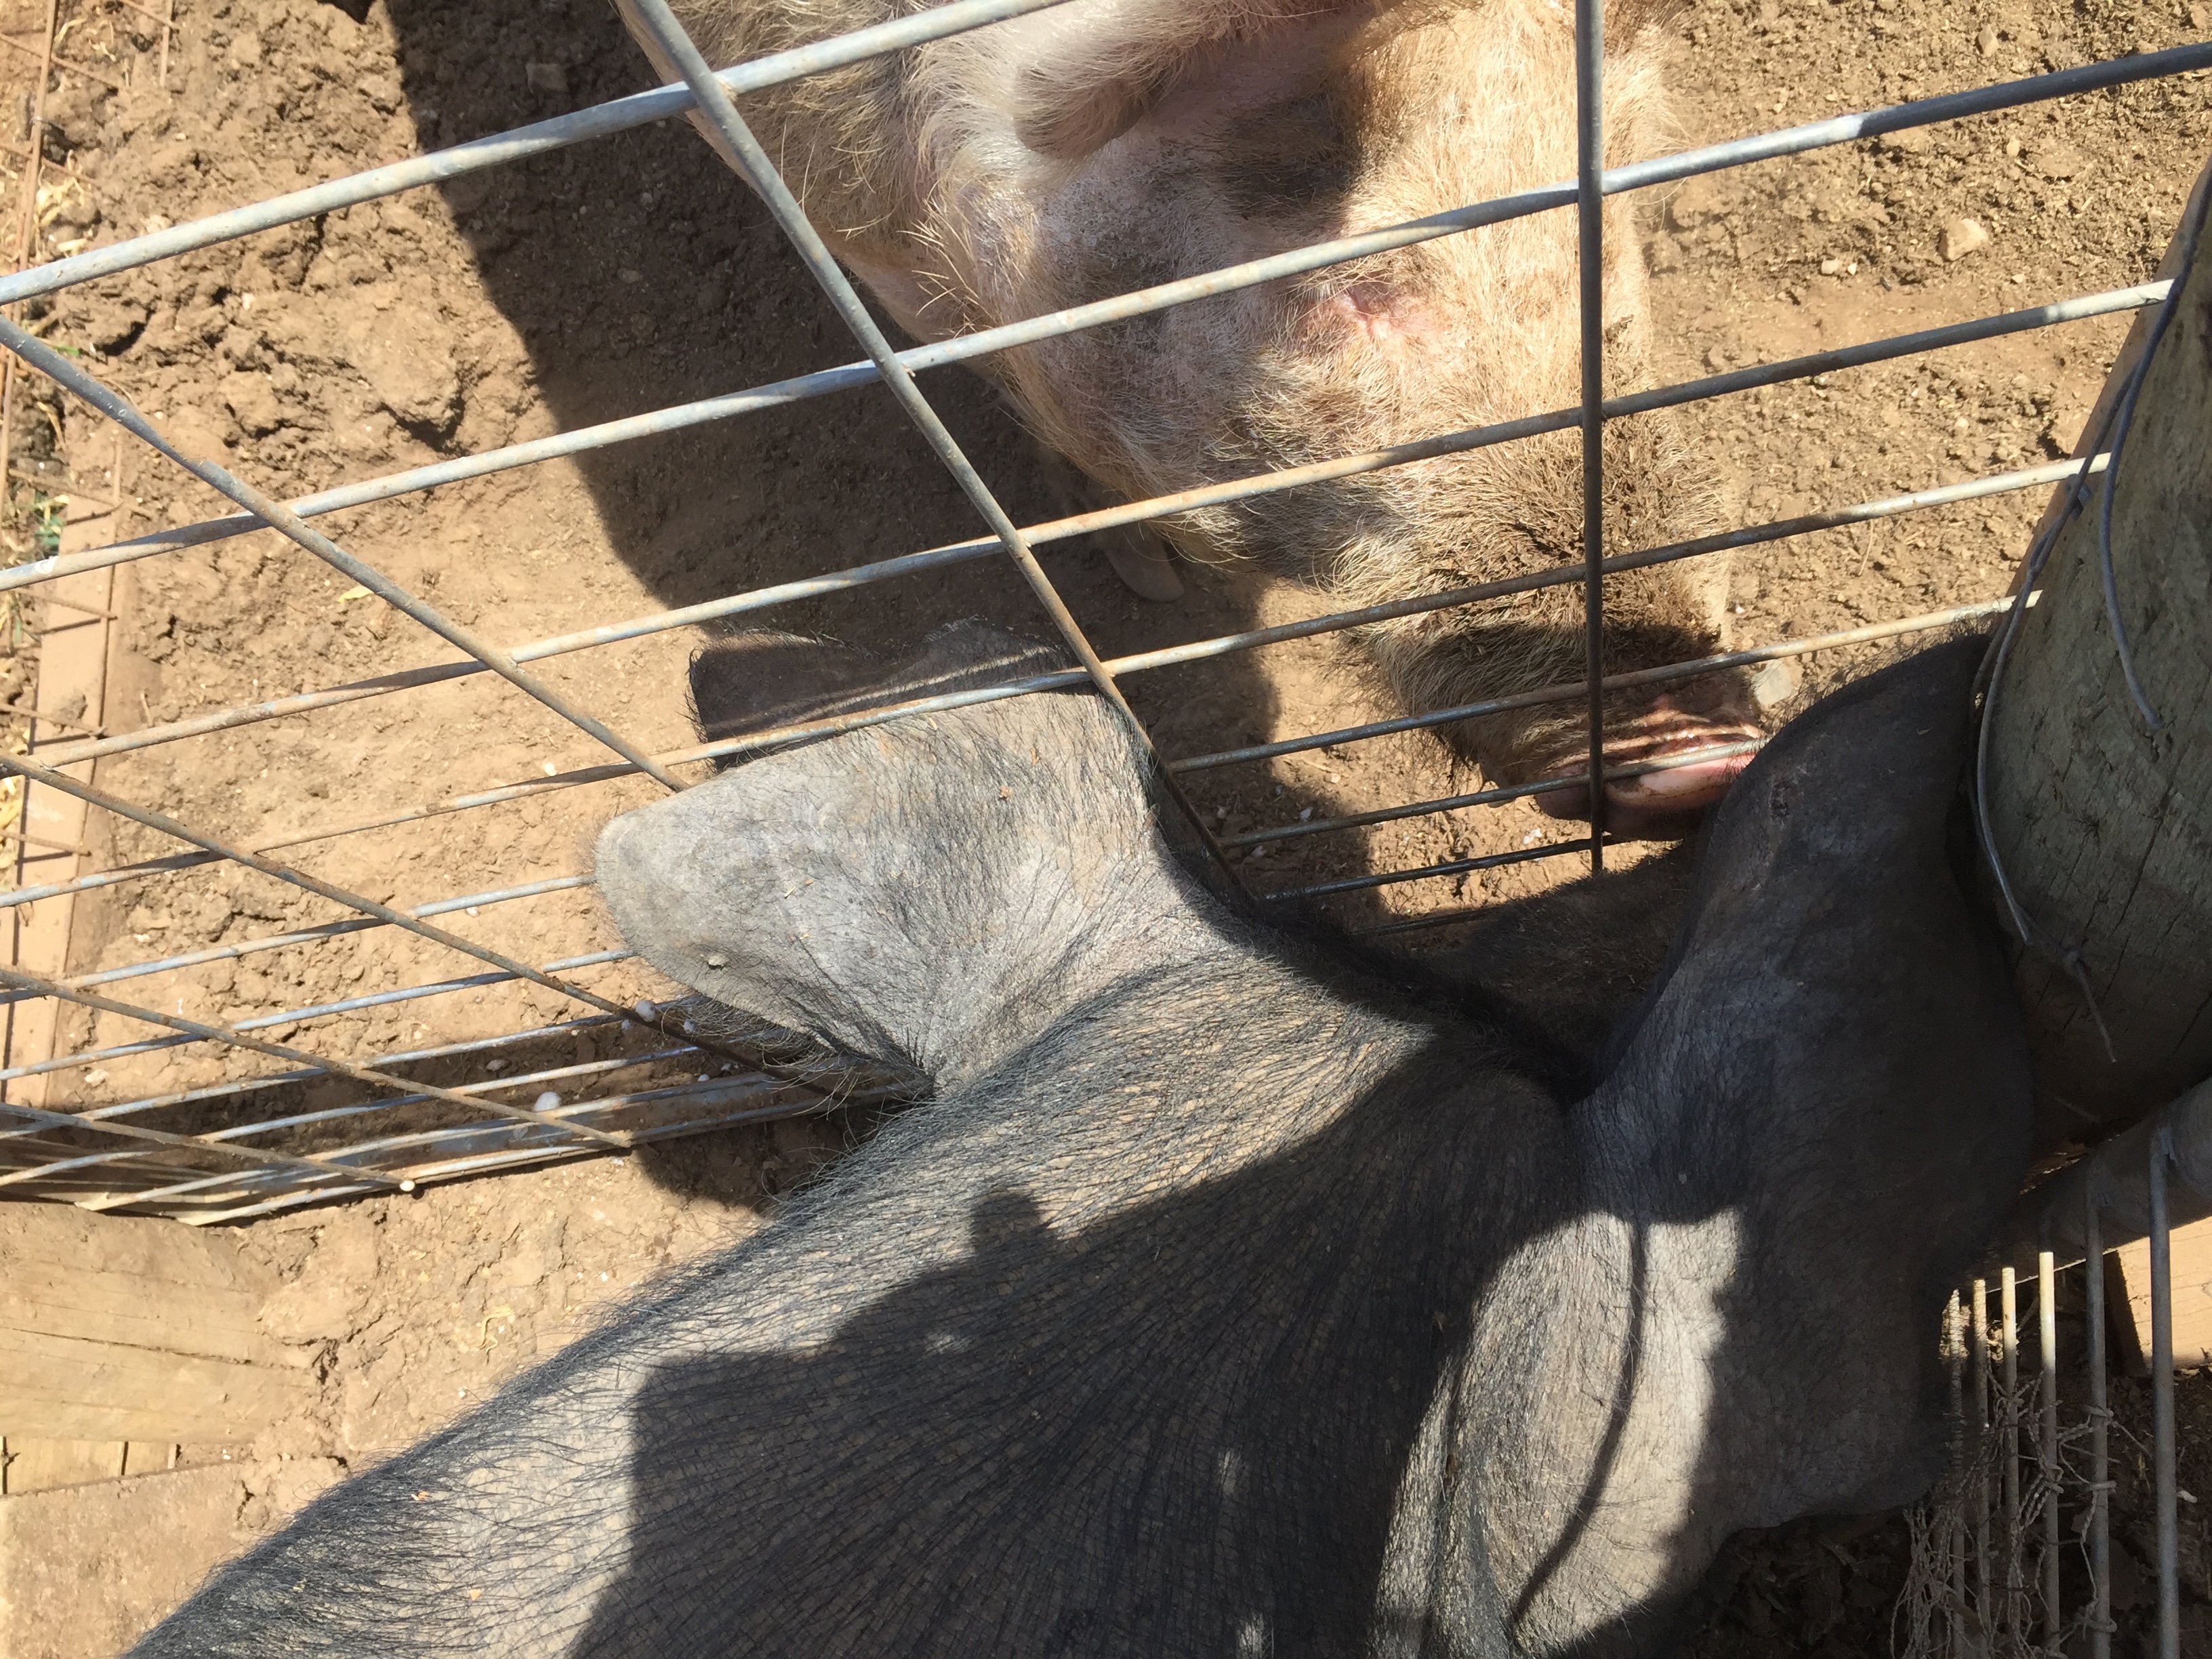
Having the boar there helps too.  He may not be getting the angle of the dangle right, but he’s stinky and that really brings out the girl’s oestrus behaviours.  It also keeps them calm and standing still during the AI process.  They’ll basically go nose-to-nose with the boar while you mess with their bits, and they’ll not fuss at all.  This is actually an argument to keep Boris here even if his stubby little legs aren’t up to getting the girls pregnant.  It’s not entirely economical or sensible to keep a boar who isn’t working, but we’ll not chop him unless we absolutely have to.

This is Boris' look of seduction. Works every time.

This is Boris’ look of seduction. Works every time.

Boris and Miss Swan whispering sweet nothings to each other.

Boris and Miss Swan whispering sweet nothings to each other.

The process is simple, mainly because of the sow’s physiology.  A sow’s cervix interlocks and kind of clamps together.  This is exactly why a boar’s penis is shaped and built like a screw – it literally has to drive in.  All other mammals deposit sperm in the vaginal cavity, but with pigs the boar’s penis is caught in the sow’s cervix and the sperm is deposited inside the uterus.  Pretty cool, right?!  Seriously, you should google the process.  It’s fascinating.  You’ll want to be specific with your search term though, otherwise you might get back some weird results…

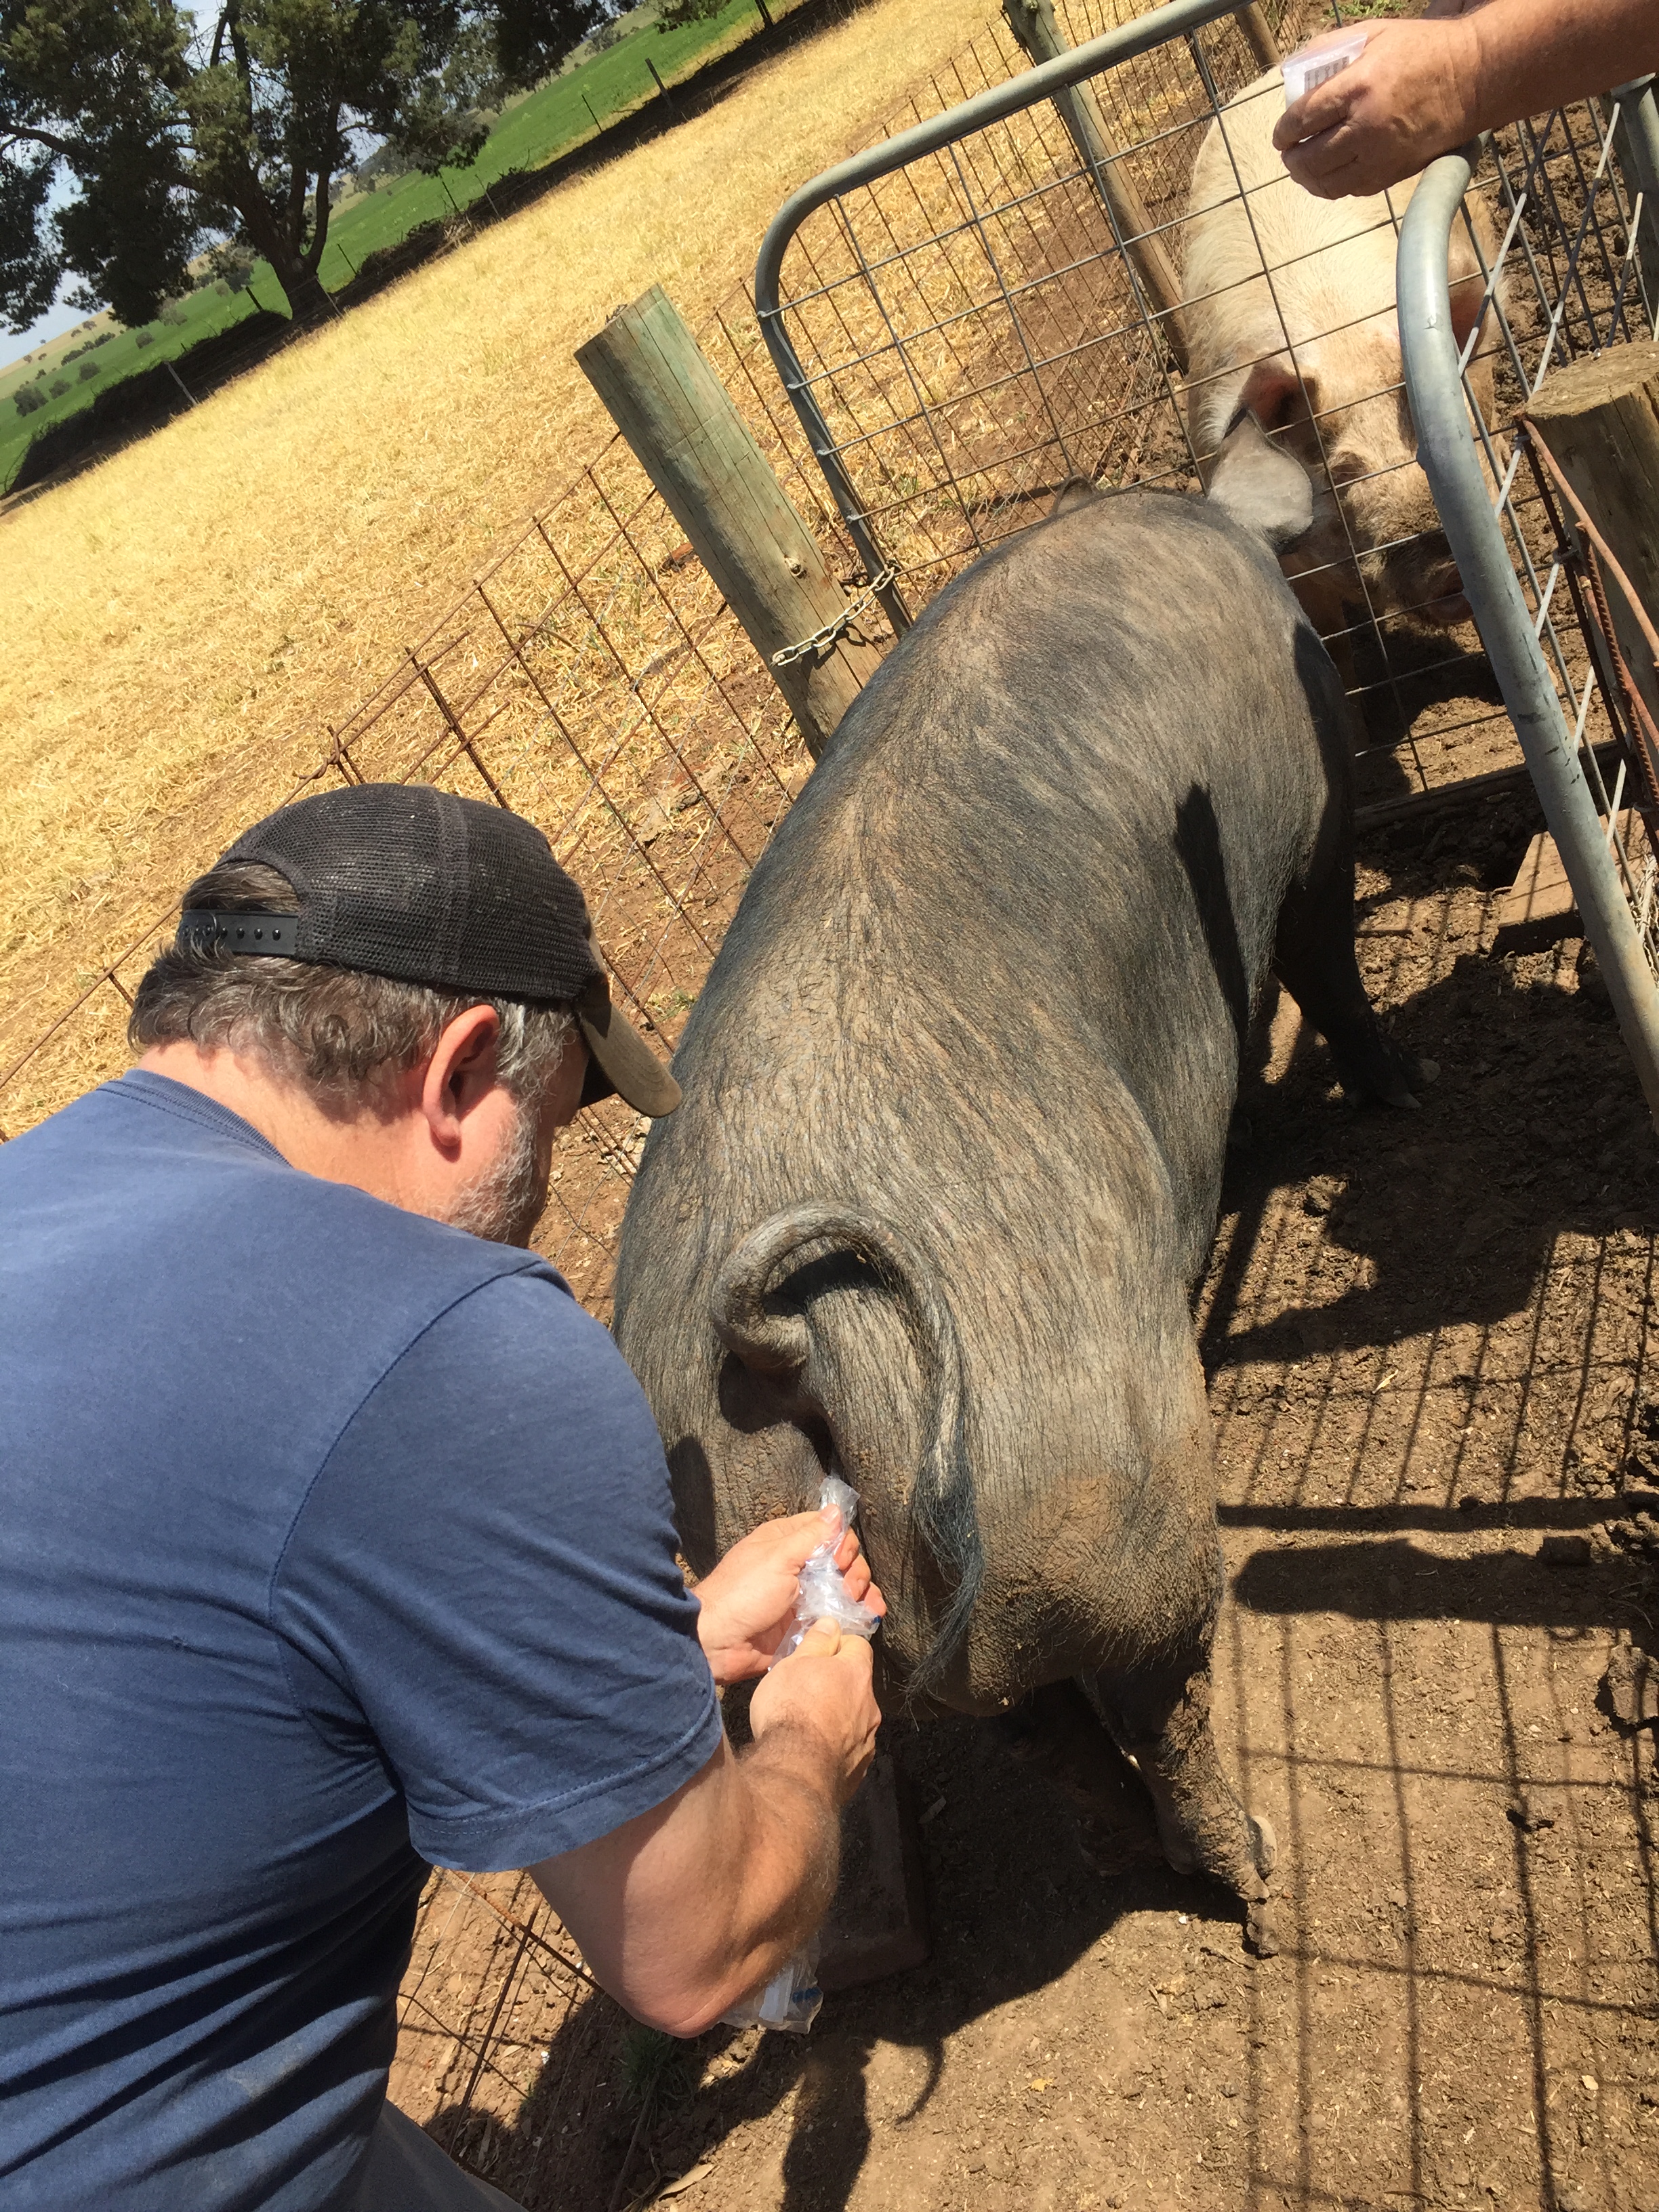
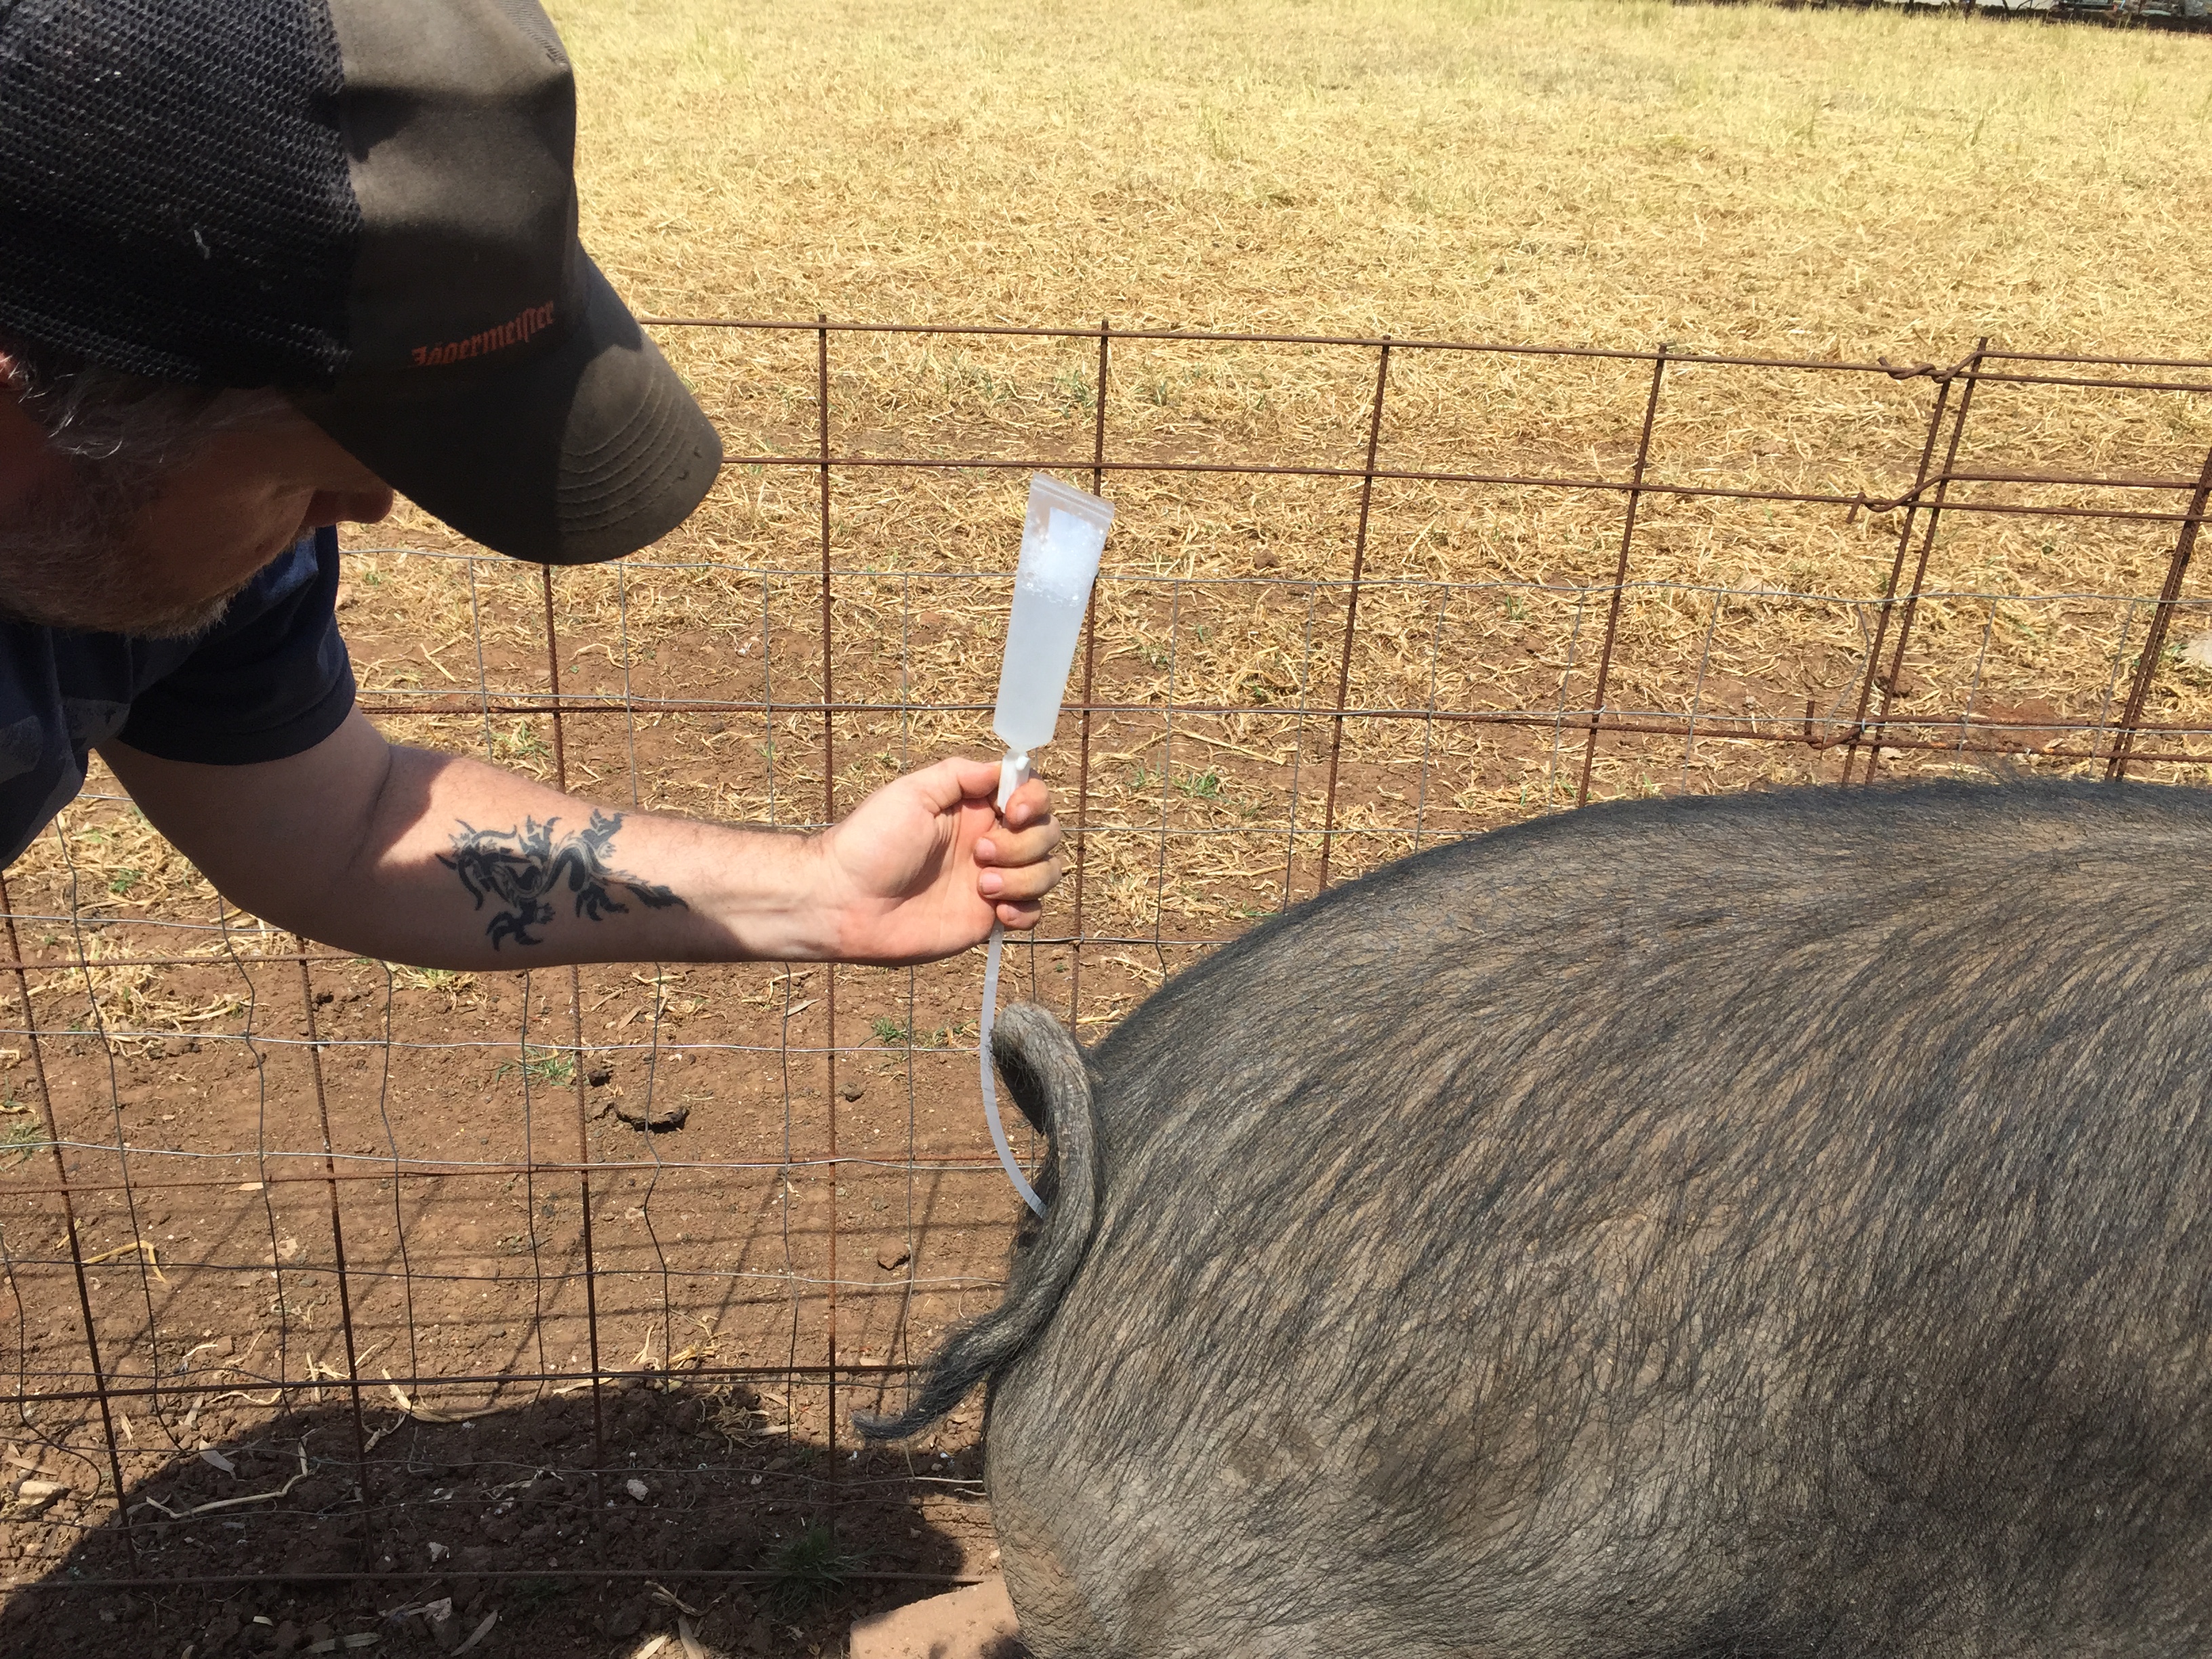
There are catheters called “spirettes” which mimic the boar’s penis shape.  During the AI you apparently literally have to screw them into the cervix.  However, both the vet and the farm we went to prefer gel tipped catheters.  With these you just push into until you feel resistance at the cervix, and the gel tip slide between the muscles as they clamp down.

Taking a step back from the cervix, you need to get the catheter to that point first, and that point is a good 12 inches in.  The catheter is covered in plastic, which is good because a pig’s nether regions can be grotty and you don’t want to be pushing that grot 12 inches into your sow.  You position the tip of the covered catheter against the sow’s vagina, angling down a little.  As you push it in, you tear the plastic back so the catheter slips in uncovered.  You pull the vulva down so the penetration is clean.  Once the tip is in, you “shoot for the stars”, as our vet put it – you push the catheter up at a fairly steep angle.  The sow is fine with that as long as the boar is in front of her and you’re not too rough.  You feel resistance when the catheter is about 2/3 of the way in, which is the cervix.

Tip in and pushed through the plastic.

Tip in and pushed through the plastic.

Resistance = cervix.

Resistance = cervix.

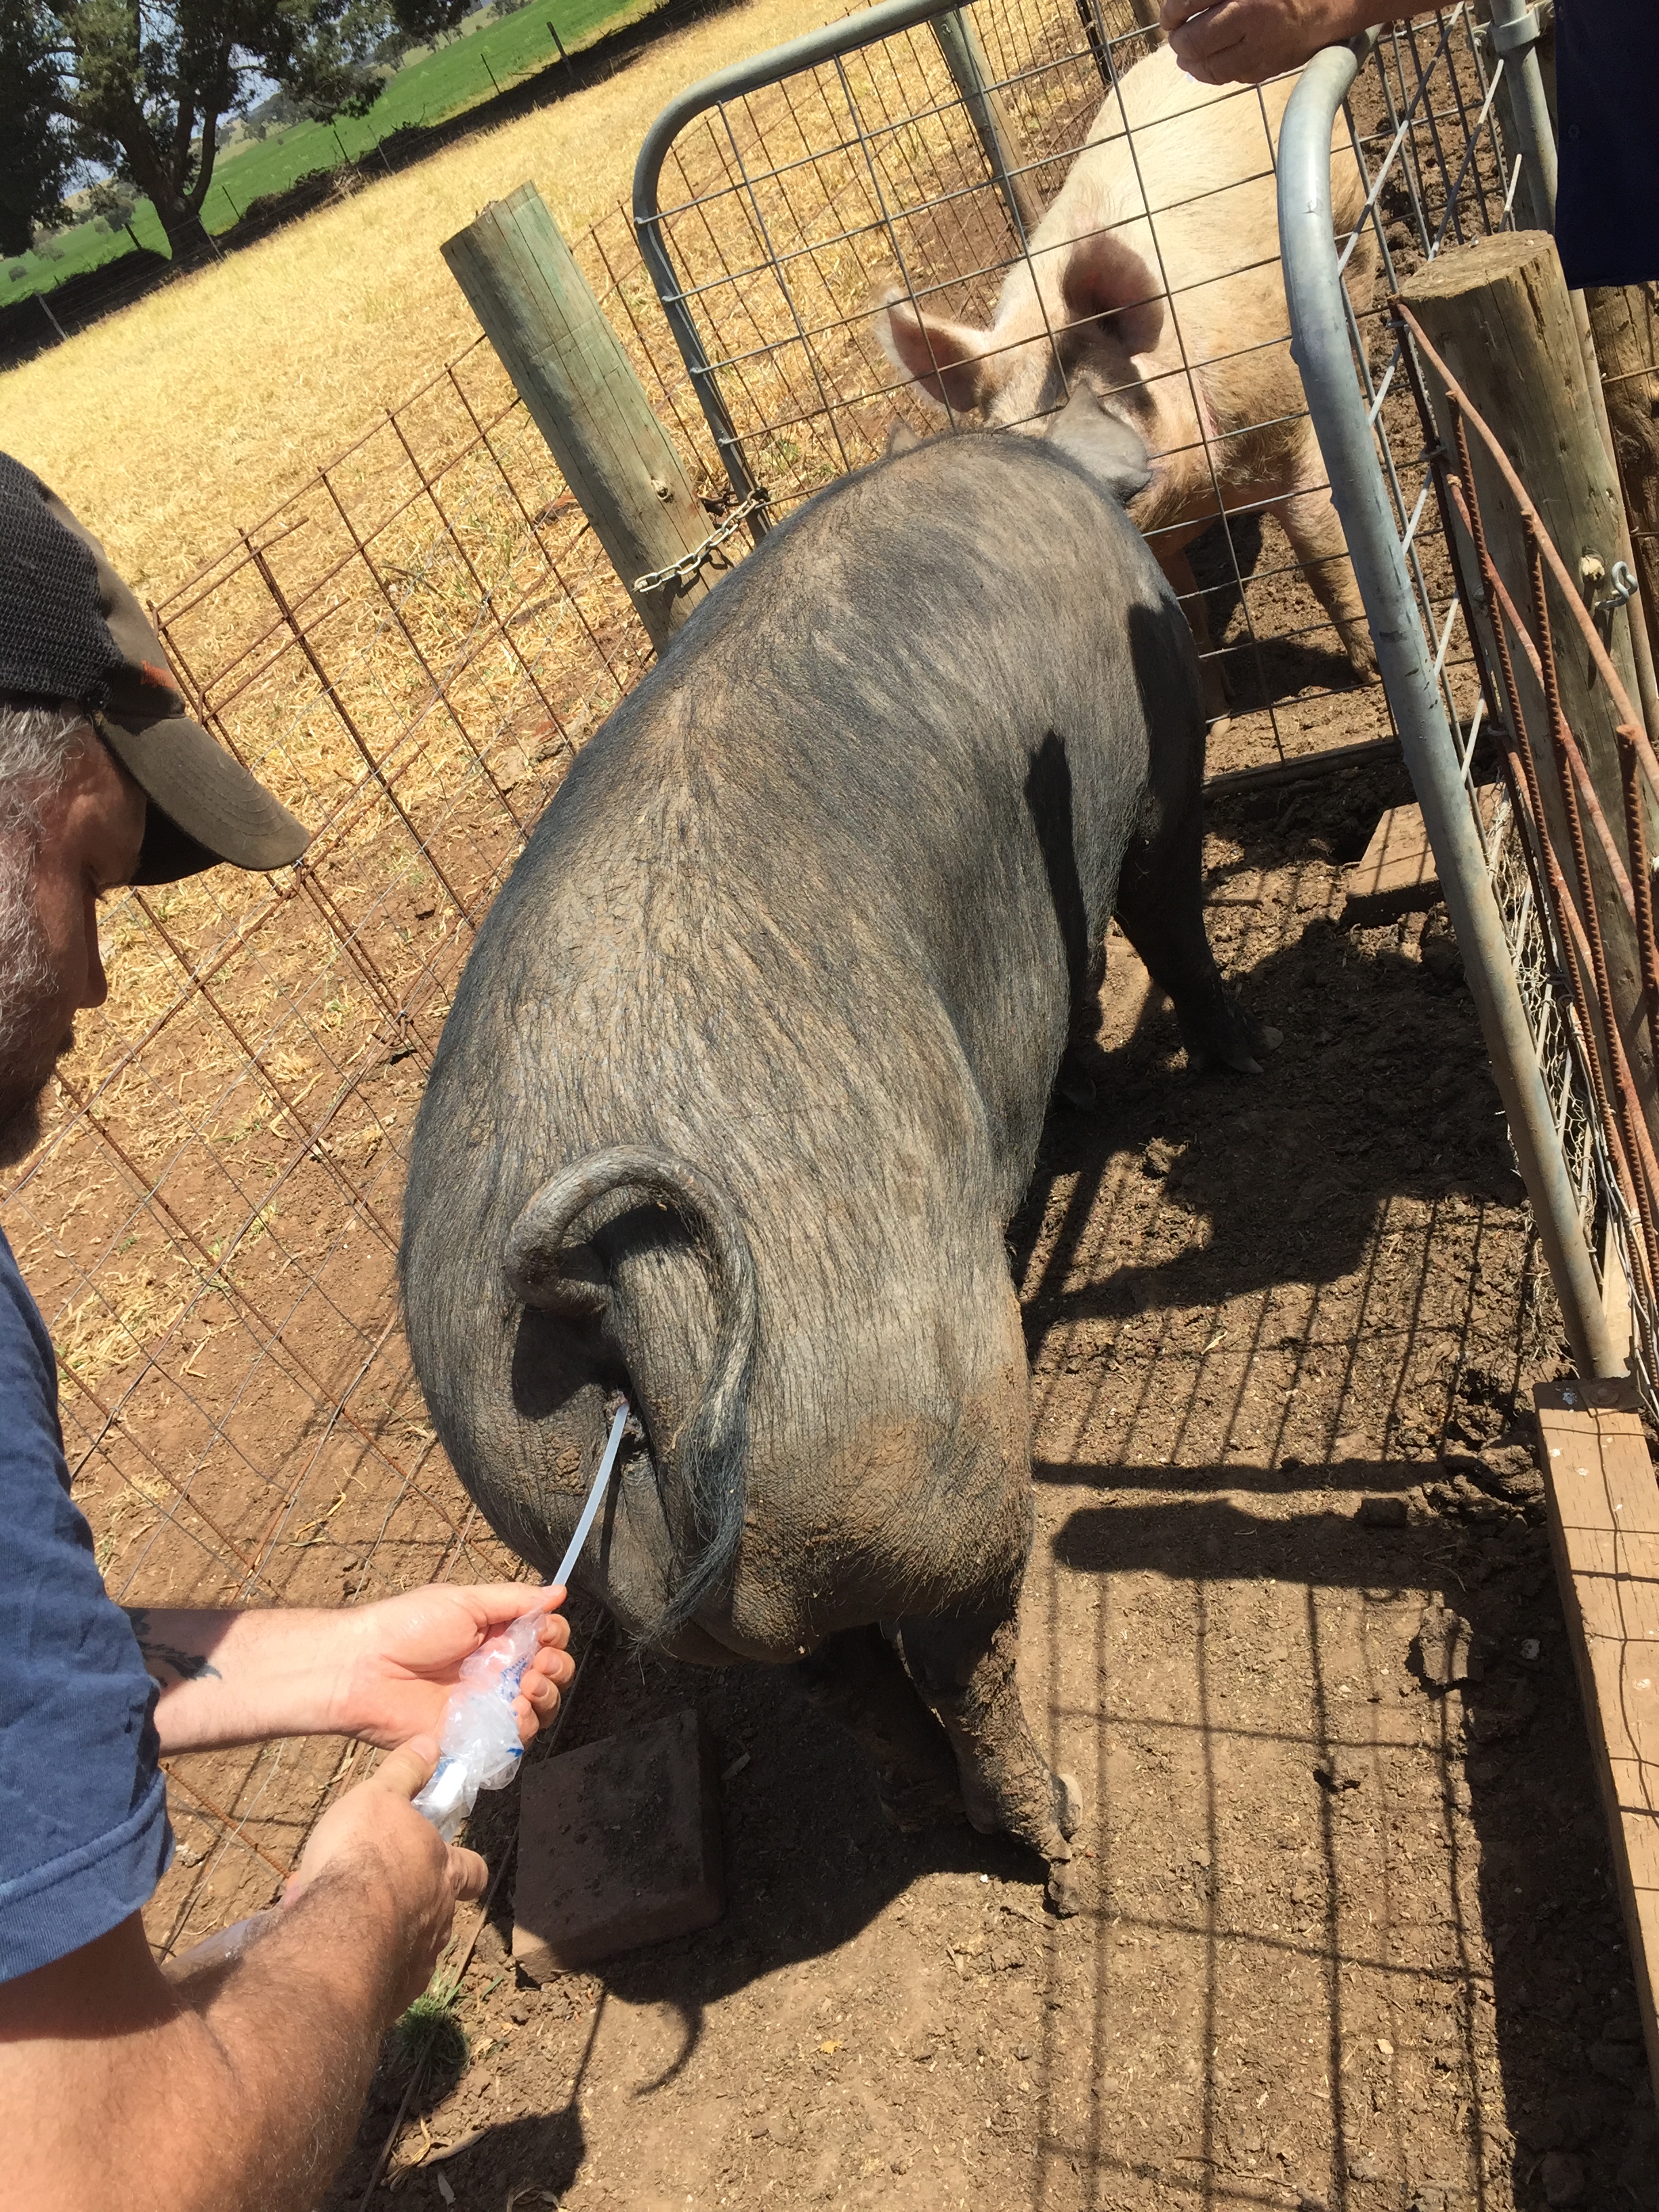
Once the catheter is in position, you break the tip from the tube of semen and insert it into the little adapter at the end of the catheter.  You don’t squeeze the tube to deposit the semen.  All that will do is force the semen in and potentially have it run out.  You may have to squeeze a little to clear an airlock though.  Once that’s done, however, the cervix/uterus kind of sucks the semen in.  It’s weirdly fascinating.  You just hold it up and the sow’s reproductive bits do the work for you.

Time for the semen. The tricky part is not getting any on your fingers.  Seriously.

Time for the semen. The tricky part is not getting any on your fingers. Seriously.

Clear any airlocks and let gravity and the sow's bits do the rest.

Clear any airlocks and let gravity and the sow’s bits do the rest.

There’s every chance the sow will stand there, nose-to-nose with the boar.  If she gets a little antsy you just lean on her back.  A combination of the catheter in her, you leaning on her, and the boar’s presence makes her feel like she’s being mounted.  The piggery even had a contraption that you could put across their back like a clamp.  It mimicked being mounted, and even had a handy dandy arm to hold the semen/catheter.  In our case, Miss Swan was super ready and just stood communing with Boris.

The lovers communing while I mess with her bits.

The lovers communing while I mess with her bits.

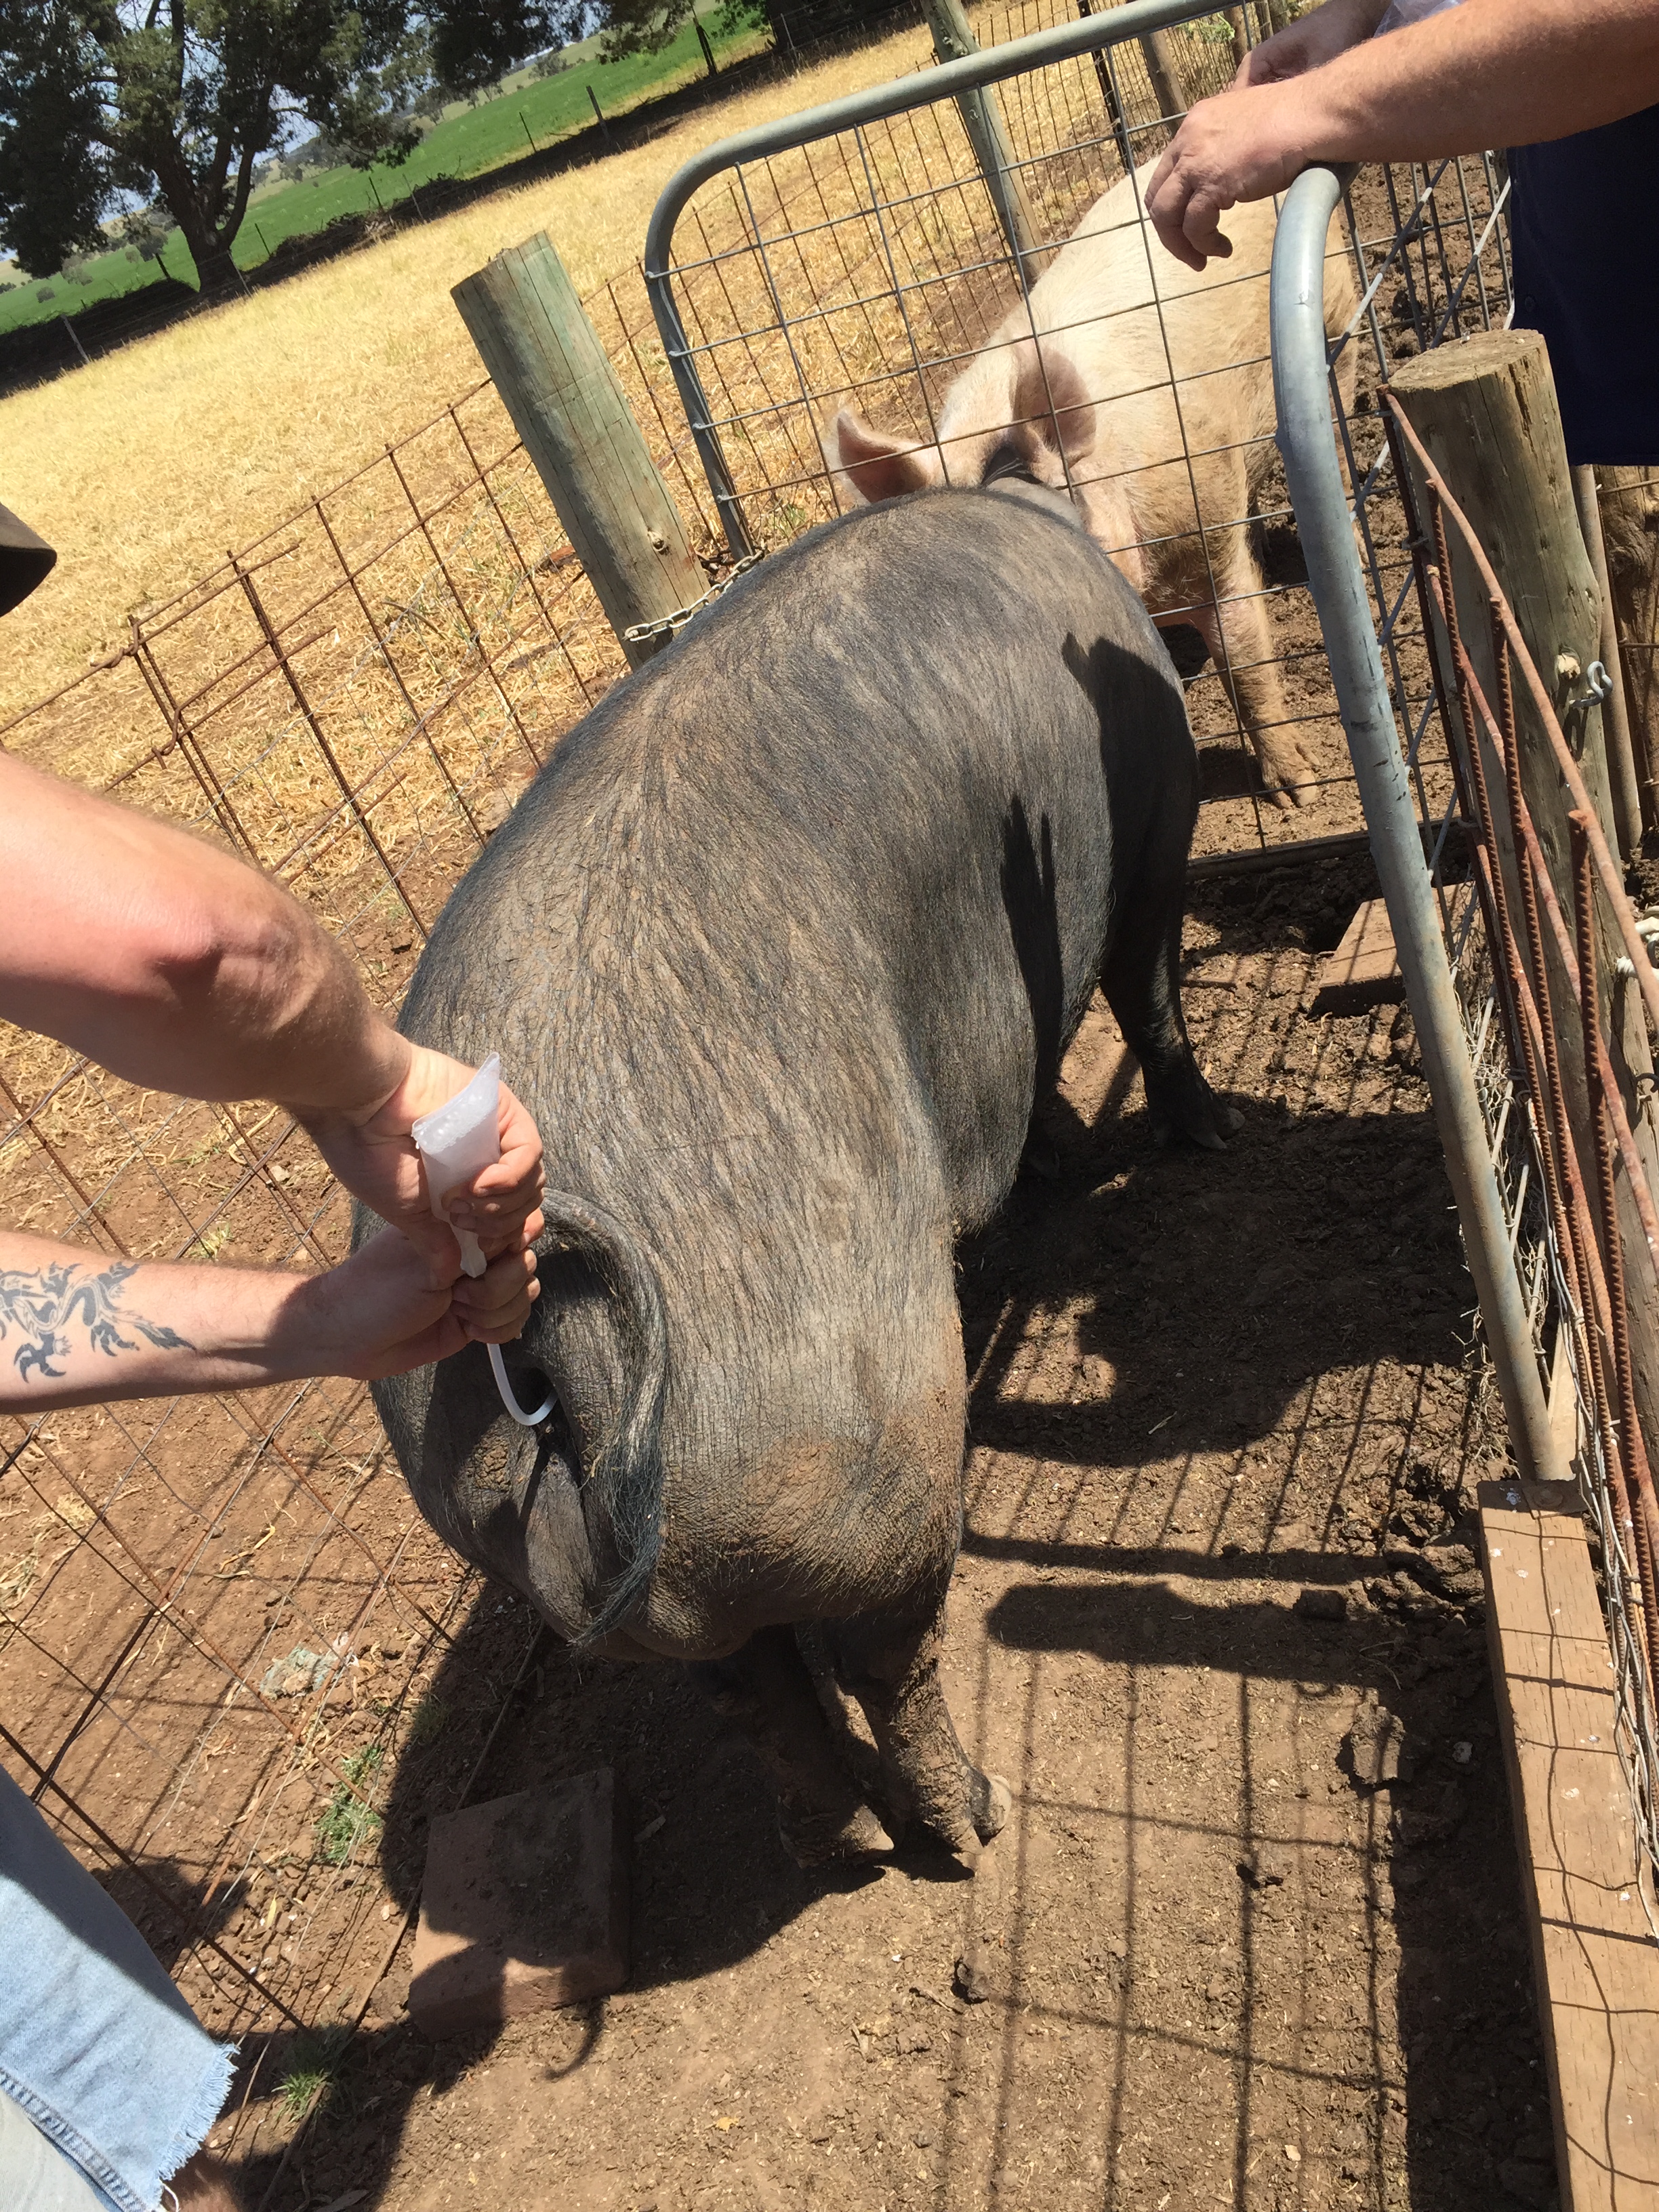
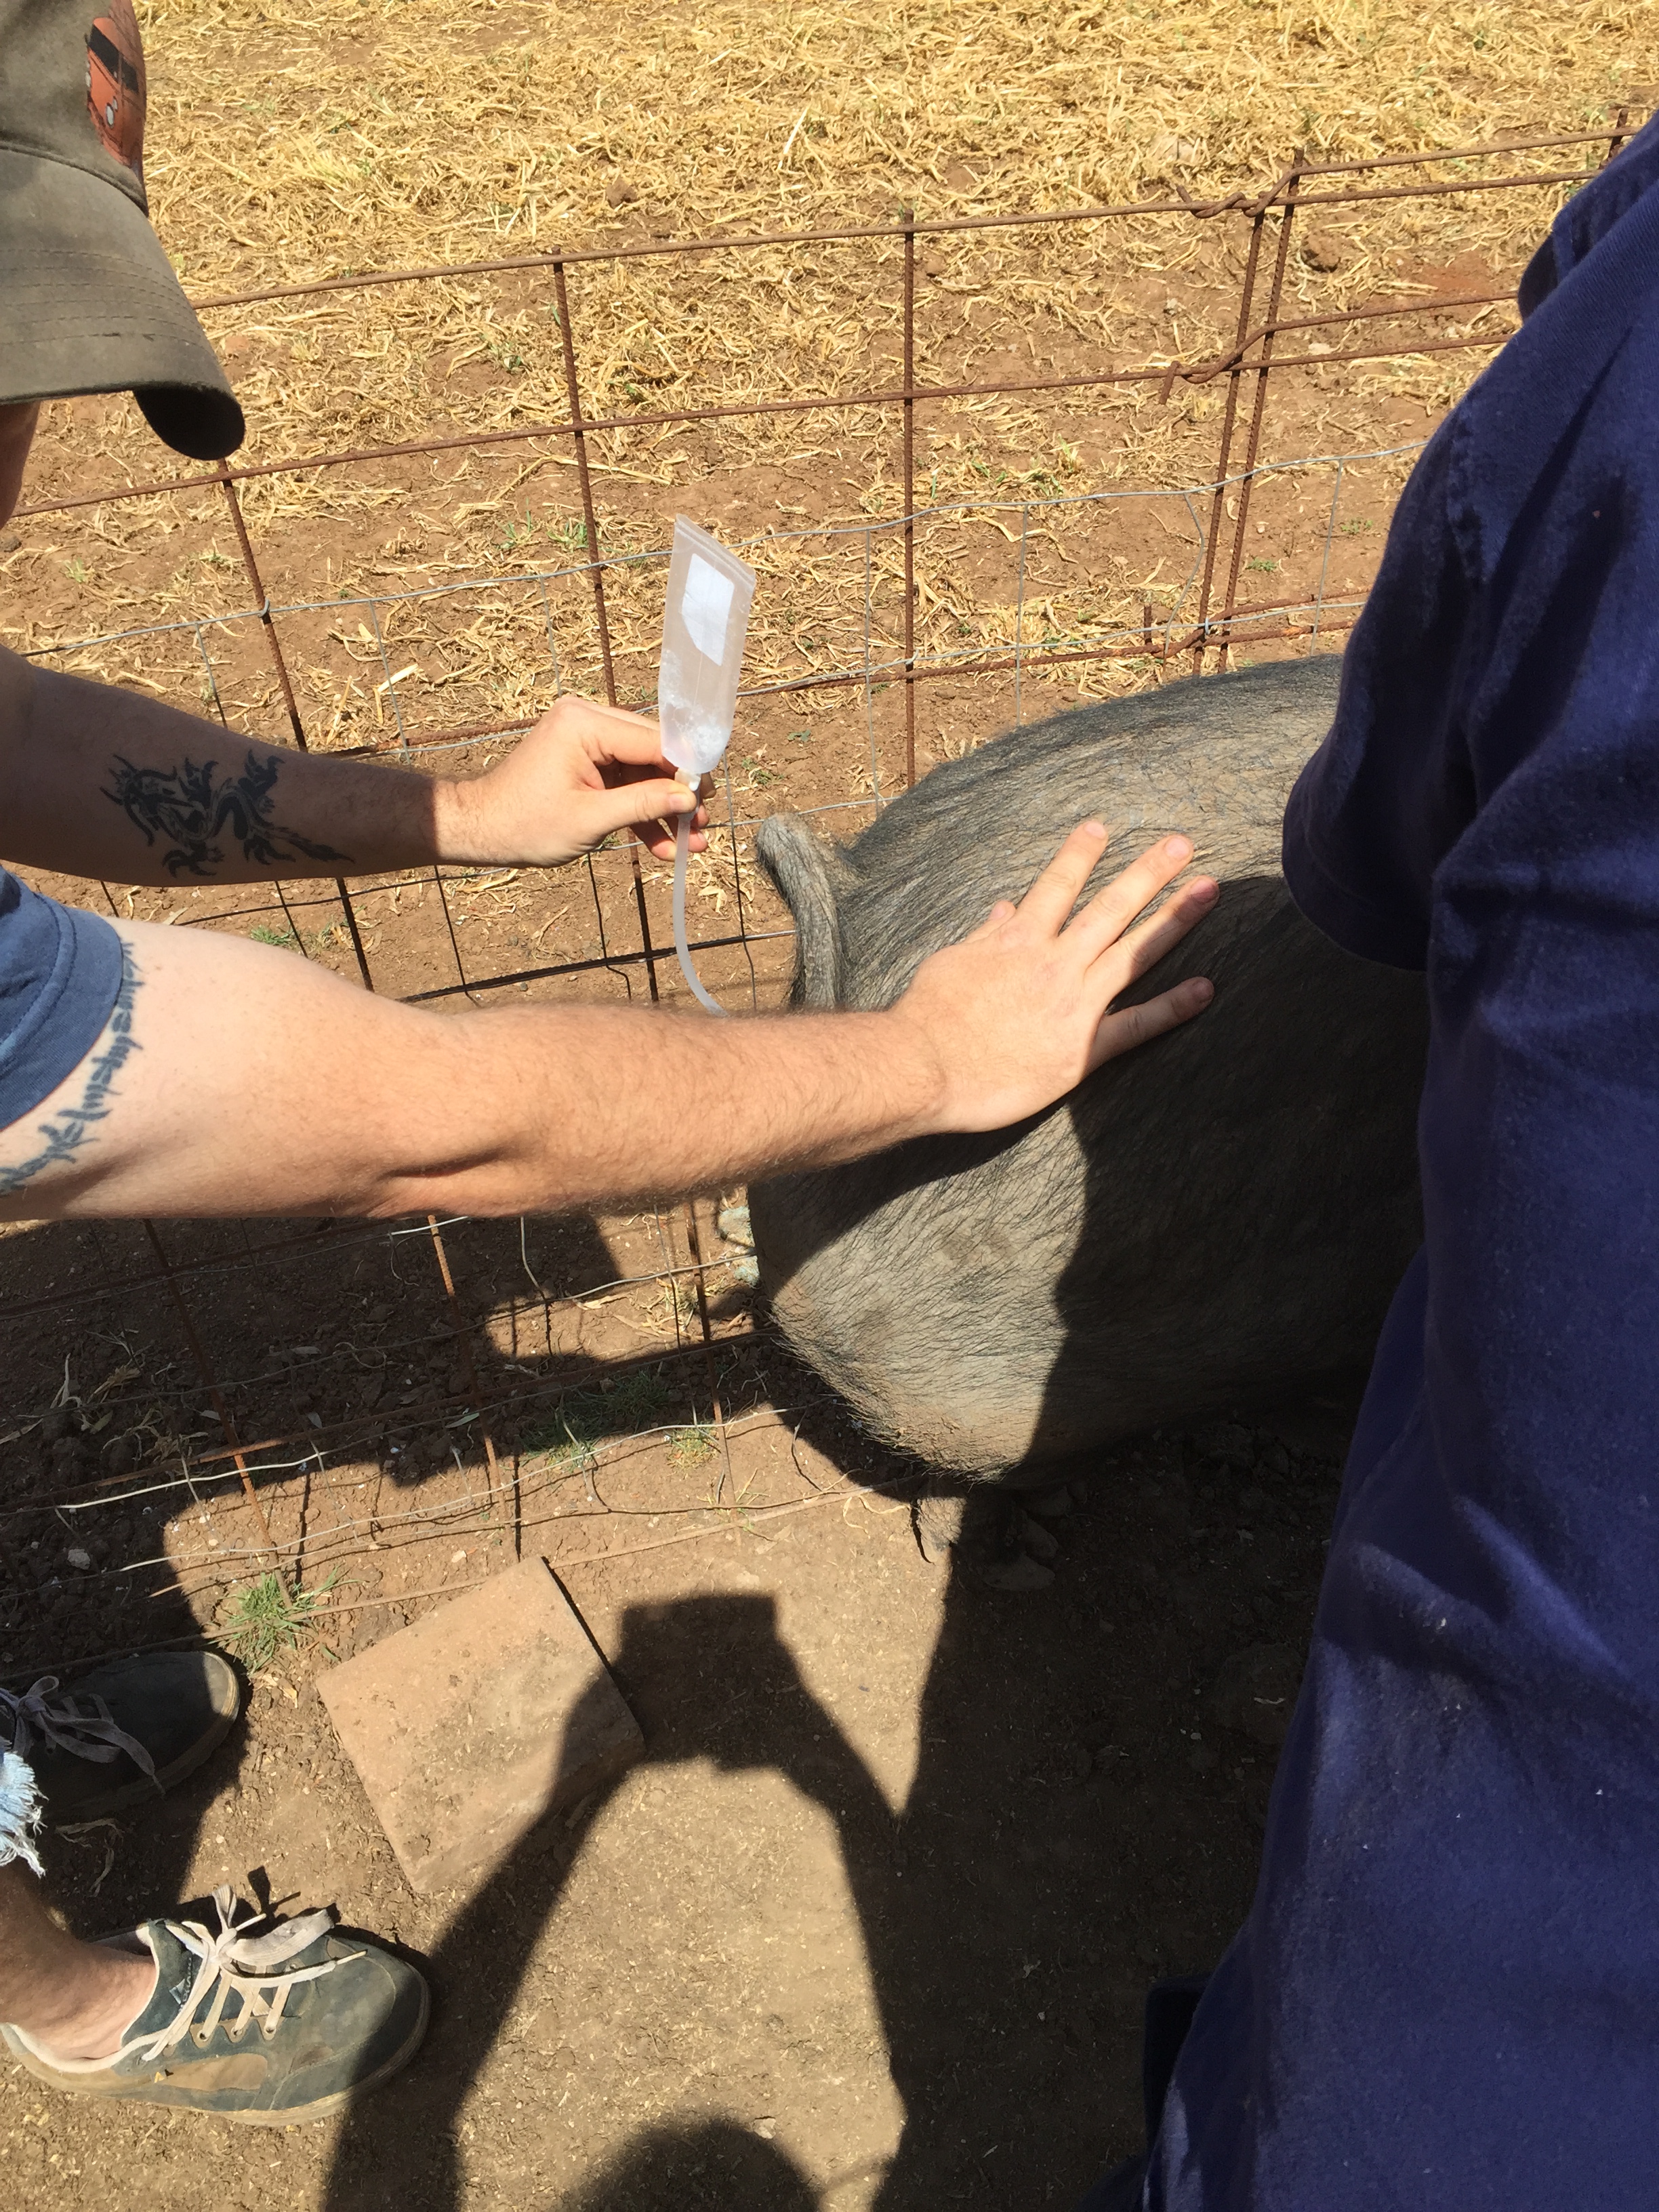
Once it’s all done, and it really should only take a couple of minutes, you disconnect the empty tube.  The adaptor at the end of the catheter has a little inbuilt plug that you put in, for reasons that should be obvious.  You then just leave her for several minutes to make sure the semen is where it should be.

Almost done.  This took maybe two minutes.

Almost done. This took maybe two minutes.

Disconnect the now empty semen tube, again trying to keep it from your fingers.

Disconnect the now empty semen tube, again trying to keep it from your fingers.

Put the plug in the catheter and let it stay for several minutes.

Put the plug in the catheter and let it stay for several minutes.

Again, Miss Swan just stood there the entire time, soaking up some Boris company.  Our race wasn’t designed for this, but works very well.  At the piggery they used a large-ish pen with four boars along one edge in their own individual pens.  The girls came in, chose a boy, and went to chat to him while we AI’d them.  That worked well, but they had space to start moving around if they were restless.  We even had one girl that wouldn’t stop trying to mount the others.  Using our race worked out much better, though it means we’re only doing one at a time, not that we’ll ever really need to do more.  The race contained Miss Swan a bit, and kept her facing Boris.  That all meant she stood still the whole time, and the entire process was quick and painless.

While Miss Swan stood still for the entire process and communed with the big man, and while she may have gotten everything  out of the experience that she wanted, I suspect that Boris was less than satisfied...

While Miss Swan stood still for the entire process and communed with the big man, and while she may have gotten everything out of the experience that she wanted, I suspect that Boris was less than satisfied…

A tube of this semen apparently contains 3 billion sperm, where the boar normally deposits around 20 to 60 billion.  Clearly 3 billion, while large, is a much smaller number than 20 or 60 billion.  However, according to the vet, you can do the job with as few as 1.5 billion if the girl is at the right stage of her oestrus.  Miss Swan was obviously ready and I suspect her oestrus started the day prior based on her behaviour.  I’m confident that this AI did the job, but we repeat the process the following day, just to make sure.

Goodbye Clarisse :(

We said goodbye to our Jersey house cow, Clarisse, in October. 😦  We’d had her for more than two years, and struggled our way up the super steep learning curve that is keeping your own house cow.  It worked though!  We had to take her back to get her pregnant; we built her a milking shed; she lost her baby so we went and got her two to foster; her and I learned together how this whole milking things works; we made cheese from her milk and seriously the best coffee you’ve ever tasted! We even had a small mastitis scare, and I had to give her a course of antibiotics, involving a week of injections in the butt! (her butt, just to be clear)

The problem we faced was that we had no time.  I’m not exaggerating either – we have zero spare time nowadays.  We’re trying to stand a business up and get more land to expand, and we’re about as time-strapped as you can be.  I even gave up my veggie patch this year to free up some time.

We had been milking Clarisse weekly, both Saturday and Sunday, getting enough for the week.  We were at the stage where I’d not had time to milk her for five or six weeks though.  The calves were still taking milk, so she was full, but we weren’t using any of it.  Keeping that size animal with her food demands on a small property like ours for no return just isn’t viable. More than that though, she was made to give milk and her milk is amazing – it’s just wasteful to not milk her.

As much as we loved Clarisse (not dad, they hated each other), selling her was even harder than you’d think.  She wasn’t just a giant pet to us, even a pet with benefits, she represented a huge step in self-sufficiency.  With her we could provide pretty much any dairy need for the family.  It’s difficult to overstate just how important that was to us, and how hard it was giving it up.  However, you need to be practical about this stuff.  Not having her here means we can expand our pig paddocks a little and help bridge the gap until we get a bigger place.  It also means that somebody will be enjoying all of the benefits she can give.

Loaded and ready for the trip. :(

Loaded and ready for the trip. 😦

We sold her with Hannibal, the Jersey she was fostering.  He could’ve been weened, but I thought it’d help them both to stay together.  Lecter, the Friesian cross, moved up to our neighbour’s scrub lot to finish growing to a more edible size.  He’d never been fully accepted by Clarisse.  She fed him but never mothered him, so separating them wasn’t a huge deal.  He’s now up with a small herd of cows on a giant block and looks to be loving life.

The people who bought her have 365 acres up at Mount Crawford, right next to the reservoir.  The place has been in their family for almost a hundred years and it’s freaking gorgeous.  They’re cow people, and have had Jerseys before.  I couldn’t have dreamed up a better home for them to go to, and they seemed to settle in right away.

Hannibal wasted no time...

Hannibal wasted no time…

...and neither did Clarisse.

…and neither did Clarisse.

We’ll get another milking animal.  I’m not sure if it’ll be another cow or a couple of goats, but I’m leaning towards another cow.  That might not be for a few years, but it will definitely happen.  In the meantime, we’ve started to grow our breeding flock of sheep.  We picked up three gorgeous ewes and a sturdy ram lamb the day after dropping Clarisse and Hannibal to their new home.

Adding to our breeding flock. The black headed one is our new ram lamb.

Adding to our breeding flock. The black headed one is our new ram lamb.

Beef Bolar Pot Roast.

My absolute favourite way of cooking when I’m flat out busy with life is anything that gives me my protein and veg all in the one go with as few dishes to wash as humanly possible. One pot dishes, slow cooker meals, and nights where Neil cooks are the greatest. Pot roasts absolutely fall into this category! So easy, so tasty, and so few dishes!

Roast beef is not a dish I grew up eating. I didn’t understand how they worked and I didn’t understand the appeal. But when Neil gives you 150 kilos of beef and then expects you to cook with it you have to learn to adapt. Thankfully, Neil’s dad David understands all aspect of English cooking and I bug him with all my questions.

Bolar roast is a family favourite. It’s a lean cut but it does have a nice layer of fat right on top and we get it back as a roast. I used the term roast loosely, it’s more like a giant 2-3kg chunk of meat. Neil likes his roast beef rare. I have never managed to cook him a rare roast beef. I’m still learning. 🙂

A lean roast with a nice fat layer on top.

A lean roast with a nice fat layer on top.

I like to use a big enamelled cast iron pot for our pot roast. It’s big enough to fit a giant roast as well as all the vegetables. I start by searing the sides of the roast in the pot and putting it aside while I lightly brown the vegetables in the same pot lifting up some of the goodness left behind by the beef.

Browned and ready to go!

Browned and ready to go!

As always a mix of carrot, onion, celery, and as an added bonus potato!

As always a mix of carrot, onion, celery, and as an added bonus potato!

The best part of a pot roast is that all my vegetables can go into the one pot. I went a little light this time on the vegetables only because I was craving colcannon as a side. By the way colcannon is mashed potato with cabbage and bacon. Greatest. Thing. Ever.

The vegetables make a nice bed for my beef to sit on and a little sprinkle of fresh thyme on top for funsies. It also tasty :P

The vegetables make a nice bed for my beef to sit on and a little sprinkle of fresh thyme on top for funsies. It also tasty 😛

I’ve decided that I love beef fat. It makes my mouth feel nice and warm and cozy and I want to eat all the beef fat. If you can get a roast with a nice layer of on top it’ll be perfect for this pot roast. You can sit the beef on top of the vegetables and as the beef cooks and the fat renders down all those vegetables soak up the tasty tasty fat.

I put this roast in at 3pm at 180C with the lid on and I was thinking it would take 2 hours and I would have dinner ready by 6:30ish with some resting time of about a half hour. Just in case you’re wondering that math does not work.

My roast at the two hour mark.

My roast at the two hour mark.

At the two hour mark my roast had a temperature reading of about 45C that’s lower than the temperature it should be for rare beef. It had to go back in the oven. That was fine. I did get my math wrong anyway and I had about an hour spare. I put it back in the oven with the lid off, lid off means you get crispy beef fat on top. Did I mention beef fat is my favourite??

I may have cooked it for too long

I may have cooked it for too long

Now the rest of the cooking of this particular beef roast got a bit hazy. We were a little busy. My beef roast stayed in the oven uncovered for a little longer than an hour. By the time I remembered to check the temperature it had hit 80C and apparently that’s more than what’s needed for well done. Oops. No rare beef roast for Neil again 😛

I grabbed it out and it rested for about an hour under alfoil and a tea towel. We fished the vegetables out of the pan and a gravy was made with the remaining goodness in the pot.

With colcannon and gravy. Yum!

With colcannon and gravy. Yum!

The beef was a little overdone but it was still tasty. You can’t overcook beef fat. 🙂

Next time I’ll try and remember to check it more often in the last part of cooking or at least get someone else to check it. 🙂